User Guide
Learn about using the addon in Blender.
Introduction
This guide will cover everything you must know about using the addon in Blender. It shows download and installation, use cases, and will also tell you a bit of game background knowledge.
Versioning
| Current Version | For |
|---|---|
| 1.0 | User Guide |
| 1.0 | Addon for Blender version 2.8 |
| 1.0 | Addon for Blender version 2.79 |
This guide uses addon version 1.0 for Blender 2.8.
Installation
The addon can be installed like any other addon in Blender. We
will use the Install Add-on from File
method. This method
uses a special panel in Blender to read a .zip file.
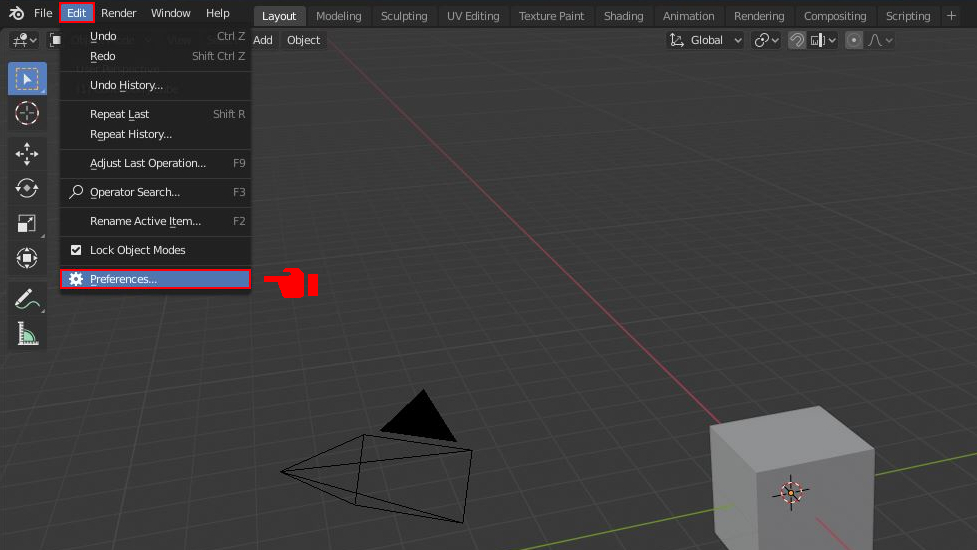
First download the addon. Leave the downloaded file unzipped and open Blender. In the menu bar of Blender click Edit - Preferences.
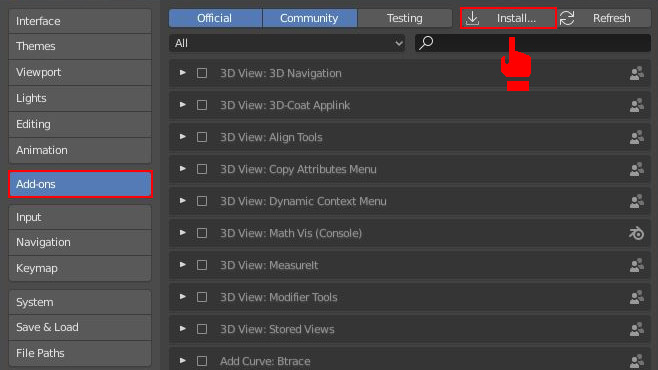
In the sidebar click the Add-ons tab and after that click the Install button on the top right.
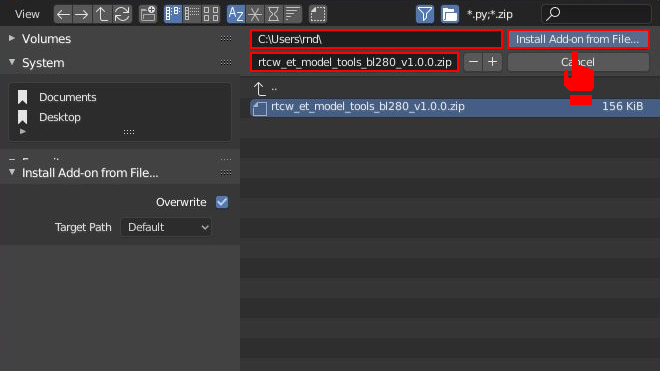
In the file dialog point to your downloaded .zip file, then click the Install Add-on from File button.
The addon is now installed, but it needs to be enabled. Search for
the addon by
typing rtcw
in the search field. Toggle the checkbox to enable the
addon.
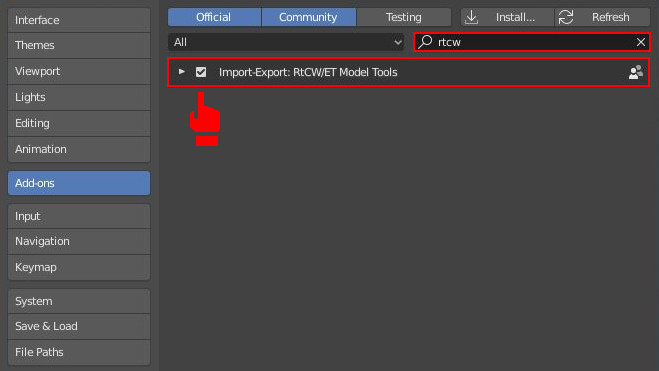
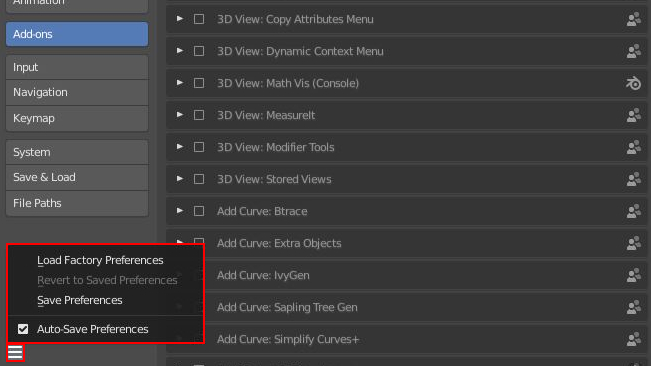
Blender 2.8 by default saves your preferences, but to make sure we check for it. Otherwise the addon will not load on the next start of Blender.
First Steps
In this chapter an overview of the addon, as well as an import and export example is given. If you work yourself through this chapter, you will have seen almost everything about the addon.
Overview
The addon is located in a Panel called RtCW/ET in the View Properties of the 3D view port (shortcut 'N'). It will be available in Object Mode only.
Note: for Blender 2.79 it is located in the toolbar (shortcut 'T'). The Sub-Panel 'Shading' is not supported.
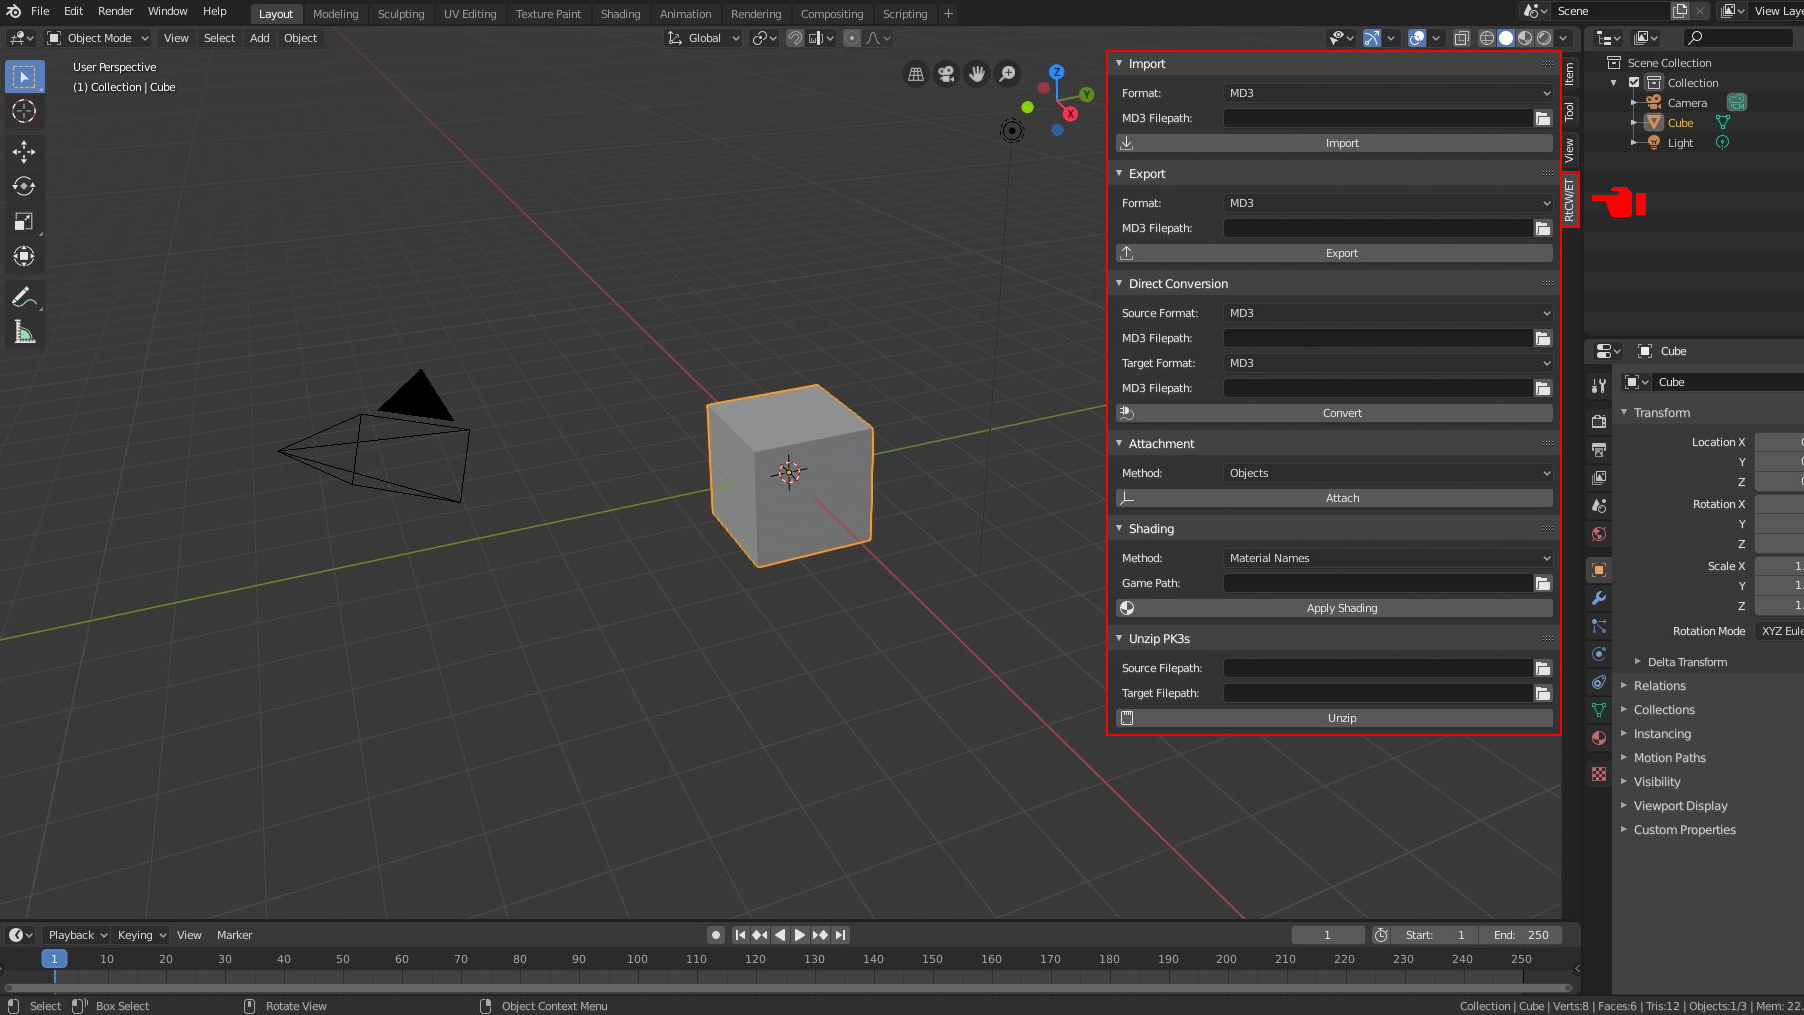
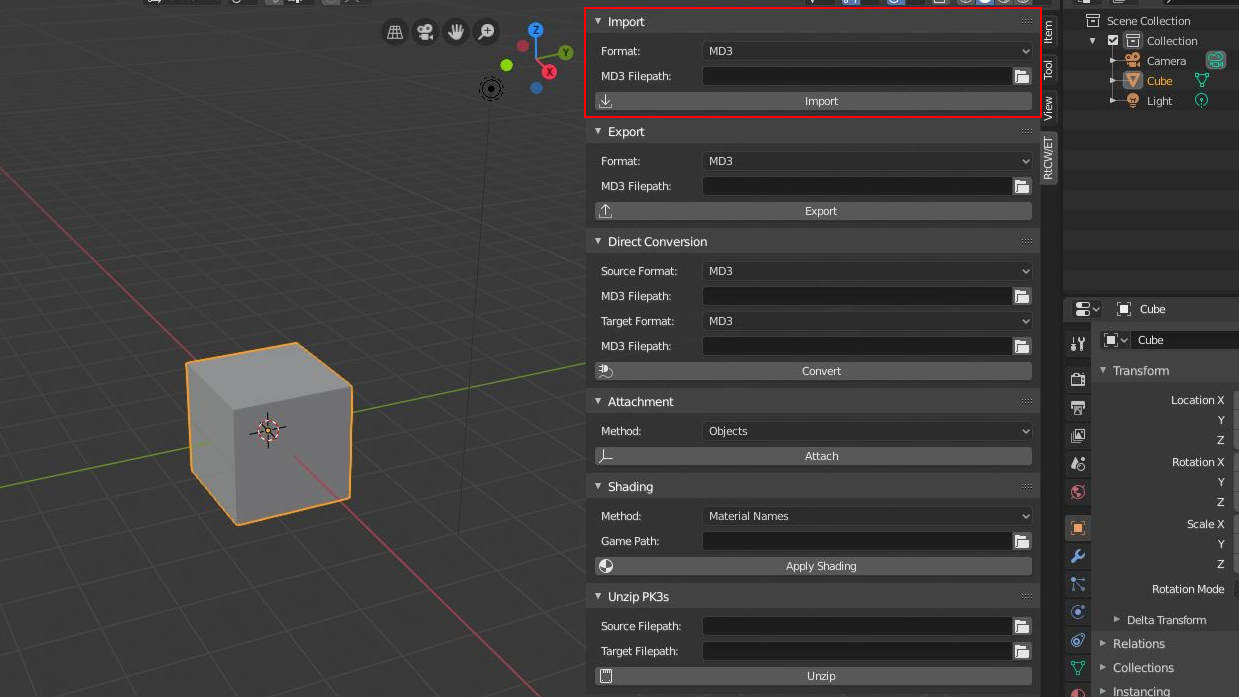
There are 5 Sub-Panels: Import, Export, Direct Conversion, Attachment, Shading and Unzip PK3s. You can find more details about those panels in chapter Panel Description.
Additionally the addon prints verbose log output to the system console. It will print debug, info and warning messages. You can open the system console under Window - Toggle System Console.
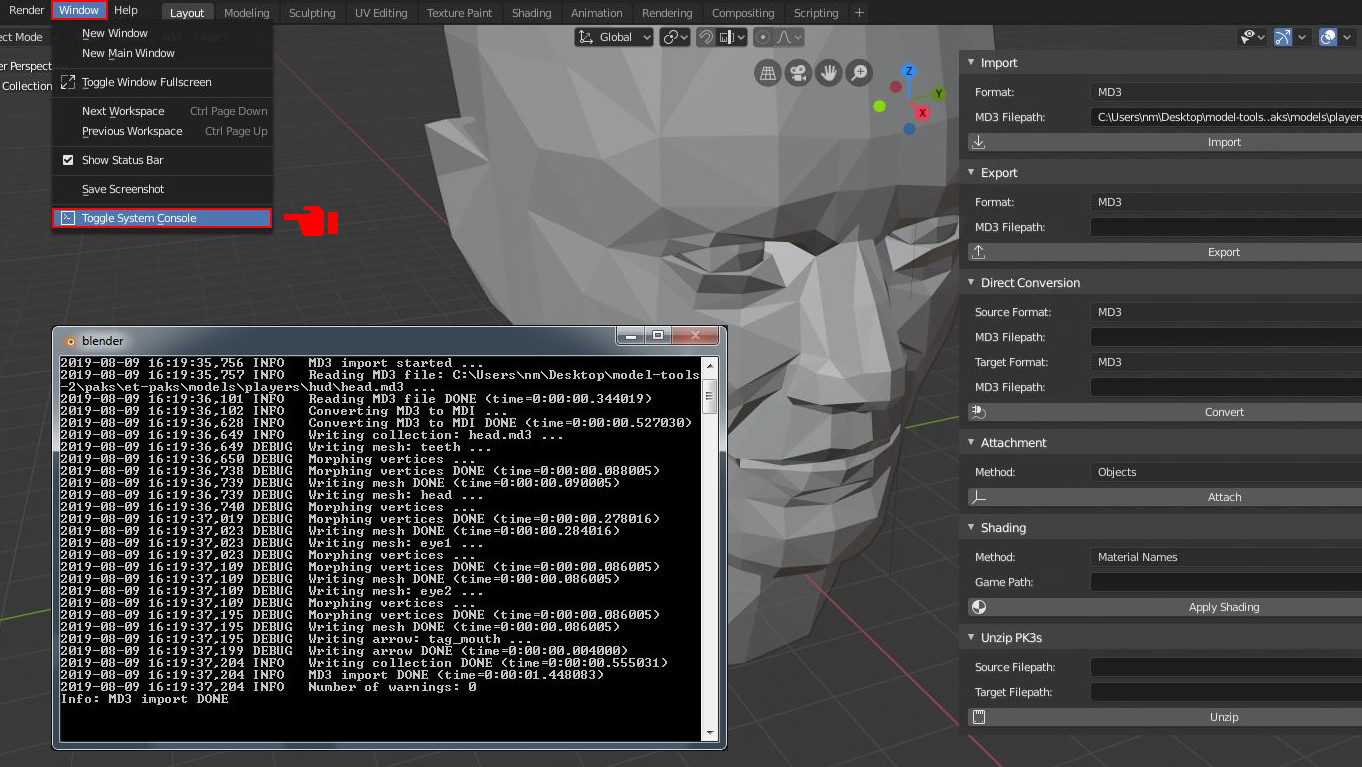
In case the addon receives too many warnings, it will redirect you here.
Import of a Character
In this section we are going to import and assemble a game character from the game Wolfenstein: Enemy Territory. Game characters are made up of many different parts. The main parts are: body, head, helmet and accessoires like the backpack. These parts are stored in different model formats: MD3 or MDC for head, helmet or accessoire models; and MDS or MDM/MDX for the body models.
Preparations
Before we start we should do 2 things: 1) extract the game data from pk3 files and 2) find out where our different model parts are located on disk.
Extracting the game data
At some point in this example (during shading or attachment) the
addon needs to have a reference to a directory which contains all
the game data in uncompressed form. Game data for RtCW and W:ET is
mostly located in compressed files whose names end with
.pk3
.
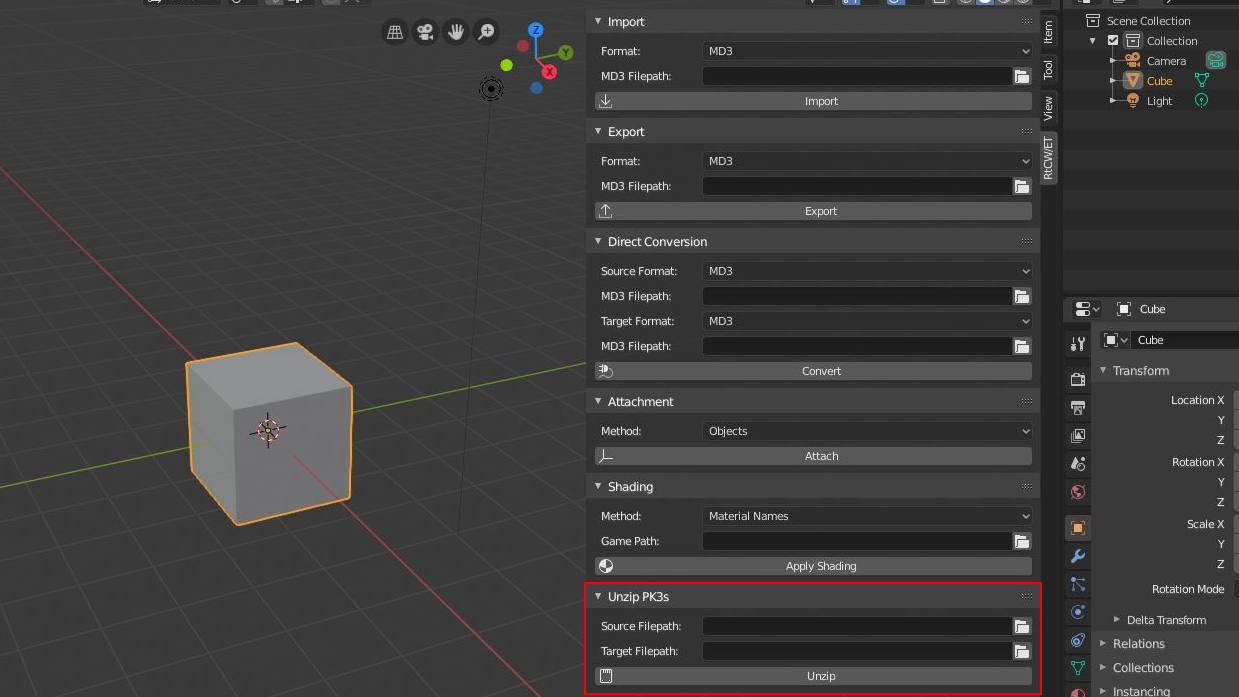
We use the Unzip PK3s panel to extract
all the .pk3 files from the game. See chapter
Unzip PK3s for more
details. For the input field called
Source Filepath search for your
W:ET installation path and choose the directory called
etmain
. For the input field called
Target Filepath create a
new and empty folder and use this as input.
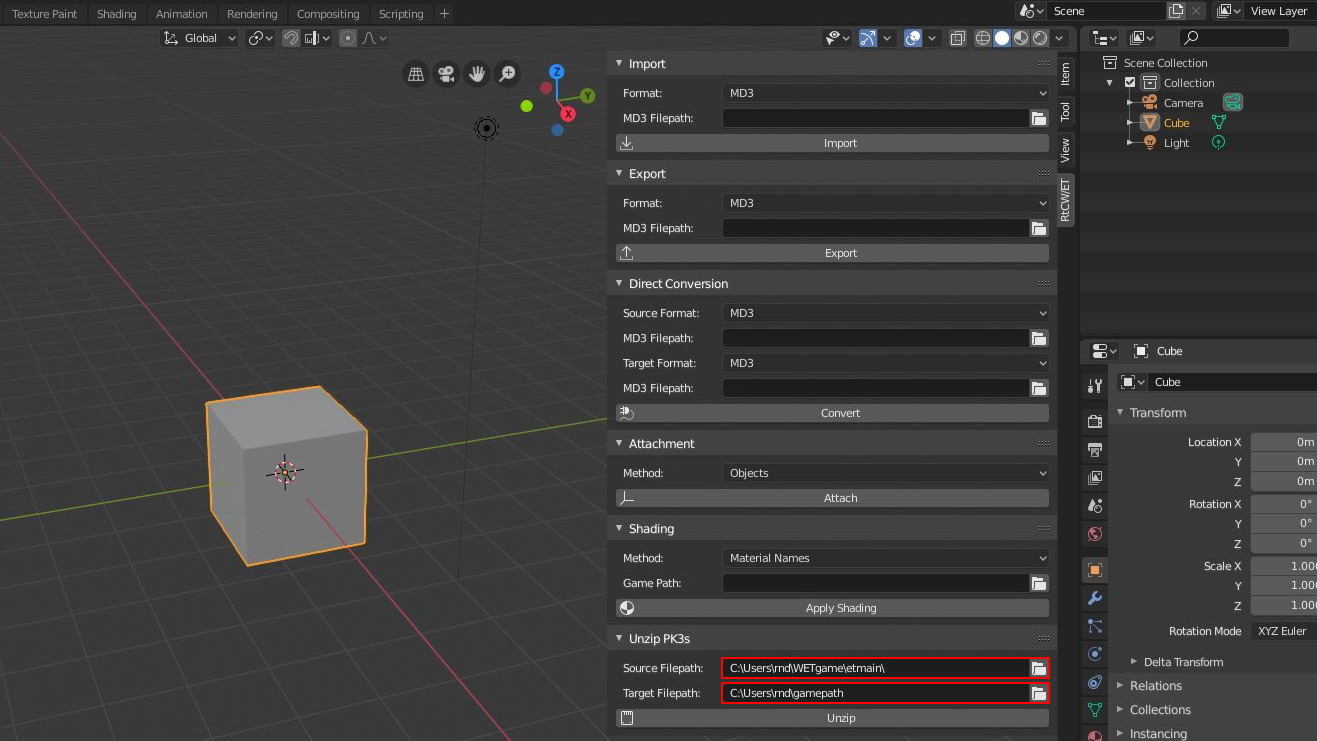
Make sure enough space is left on your disk, as the operation will require around 800MBs. Click the Unzip button and after some time your data will be extracted to your target folder. The operation will search the source directory and all its subdirectories recursively and extract all .pk3 files it finds to the target directory.
Finding the model parts
W:ET uses a system involving
.char files to assemble its characters
during runtime. The .char file for the allied engineer is located
at: characters/temperate/allied/engineer.char
. The file
content reveals some information:
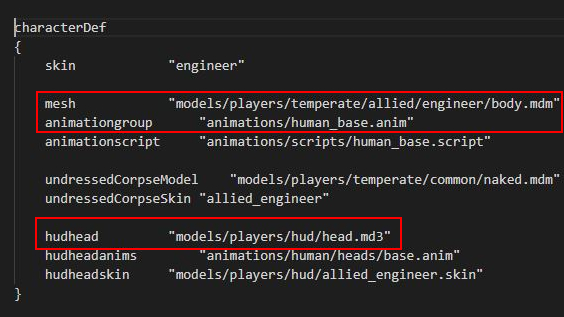
The information is either directly containing a reference to the
model files (see mesh
or hudhead
key) or it
references other script files (for example animationgroup
).
The picture above marks the information needed for the body model
and the head model. That will be our starting point.
Importing the body
The body models in W:ET are stored in two seperate files. The mesh data for the body is located in .mdm files. The animation data is separated and stored in .mdx files. This way different meshes can reuse the same animation data. This is different compared to RtCW, as RtCW stores all its data for a body model in a single .mds file.
We already have the location of the body file for our allied
engineer, but we still need to figure out where its animation data
from the .mdx files is located. We can find this information by
following the animationgroup
key-value pair from the .char file.
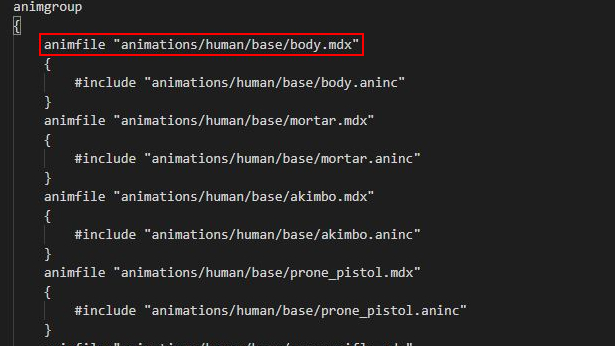
Opening the file located at
animations/human_base.anim
reveals many different .mdx locations for this character. We
choose body.mdx
for this example as it is basically the
main animation file used by all 10 characters of the game.
Now we have all the file paths we need for the body part. All that
is left to do is use the
Import Panel of the addon to import
the model. Chapter
Import has more details on
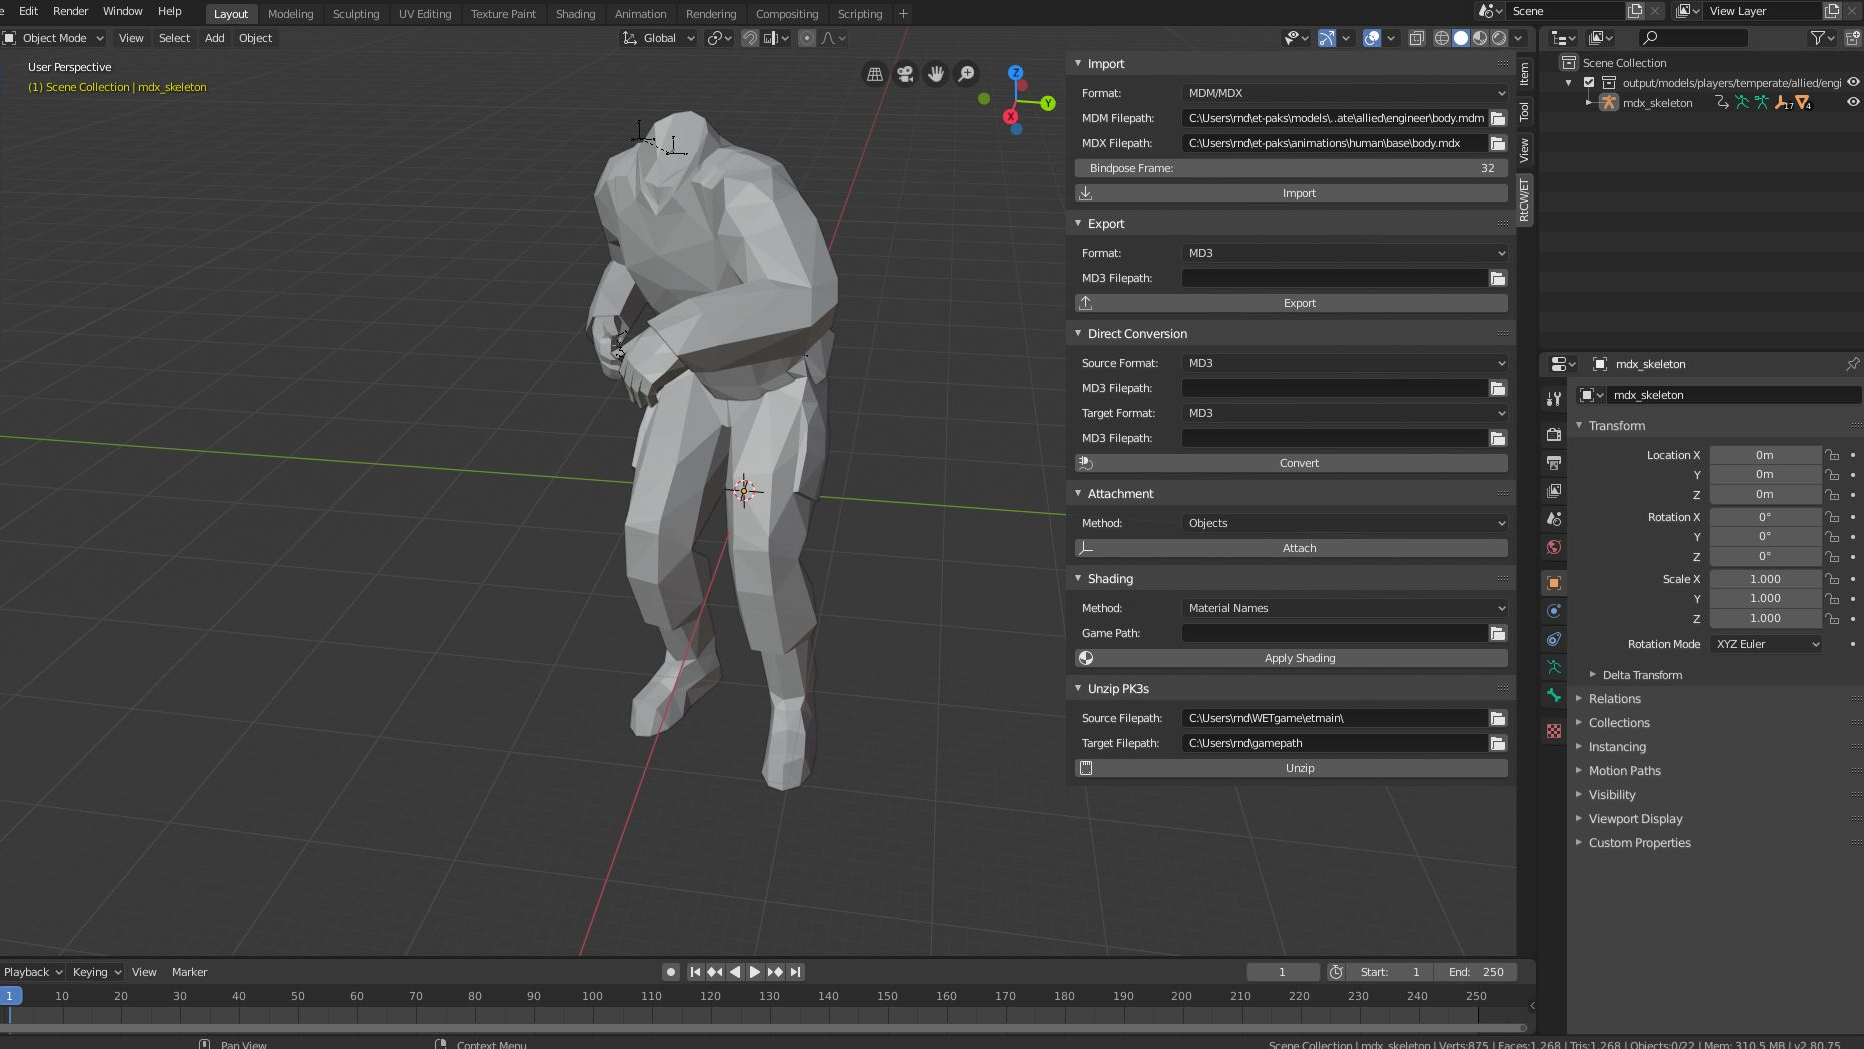
this panel. After you located the panel in Blender,
use the combo box called Format
to choose the MDM/MDX
file format.

For the
input field called MDM Filepath
choose its absolute
path. For the
input field called MDX Filepath
choose its absolute
path. Lastly,
choose frame 32 for the input field called
Bindpose Frame
. This frame influences the edit mode mesh, which is bound to the
skeleton. This is kind of a magic number. The models shipped with
the game usually have many different frames representing the bind
pose.
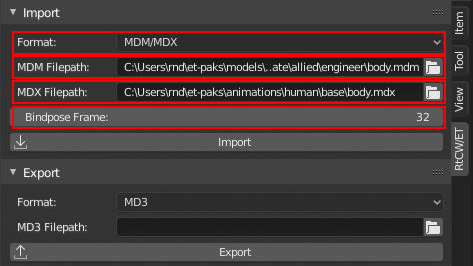
Your input fields should look similar to the picture above. Click the Import Button and after around 5 to 10 seconds (it is alot of data) your body model will be placed inside a collection in Blender. Make sure you have around 150 MB space left on disk, as the .blend files get rather large if you save them.
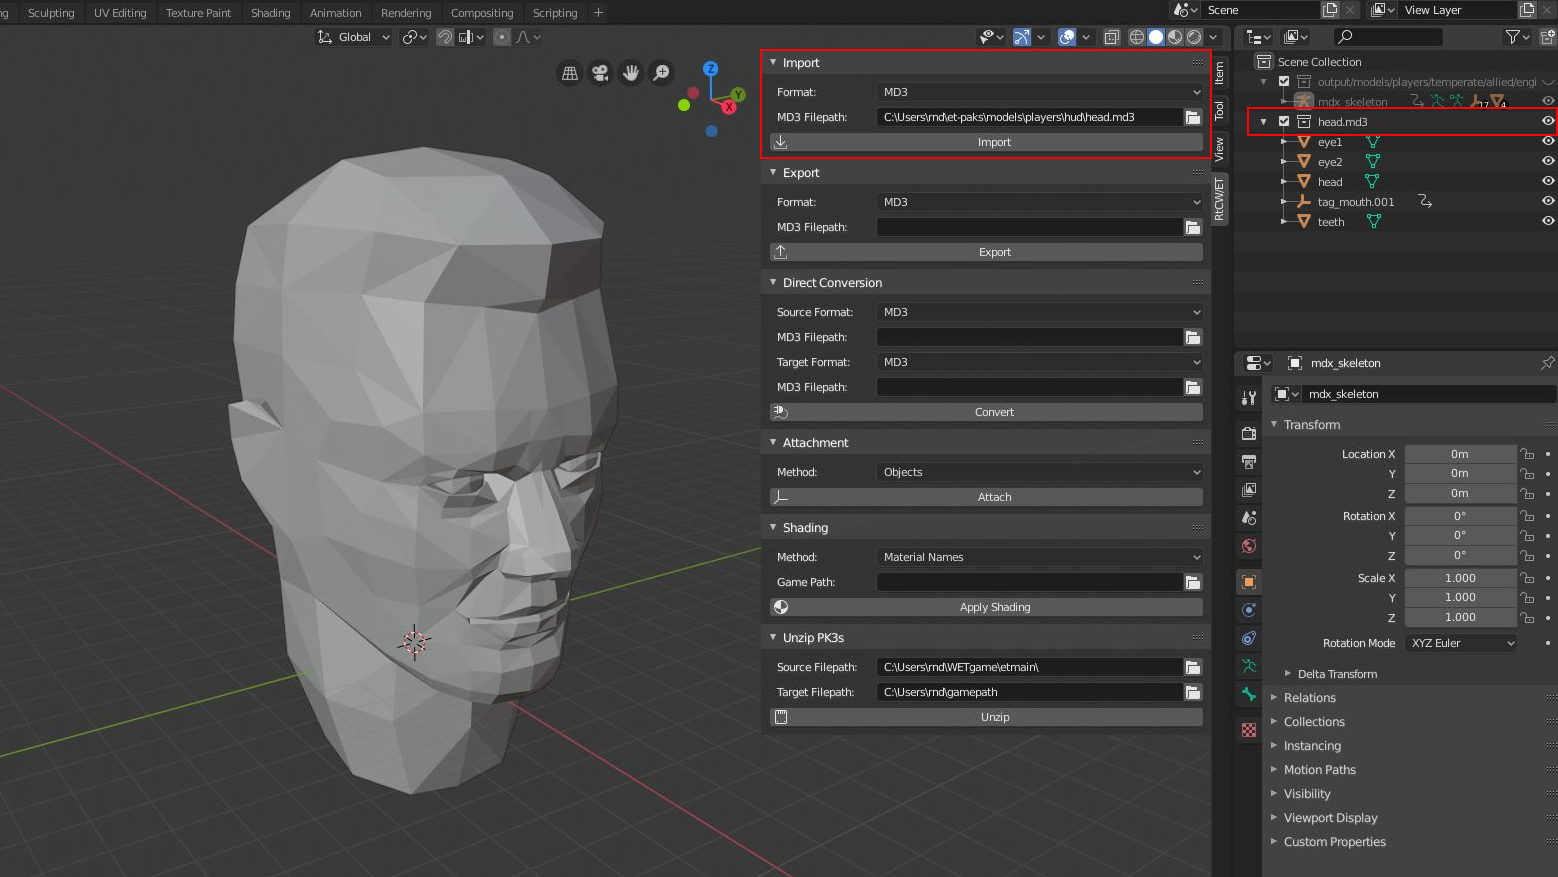
Importing and attaching the head
From chapter Finding the model parts we know the location of our head model. Let's fill in the data into the import panel for the MD3 format. This works the same as in the previous chapter. After import the head model will be placed into a separate collection.
For attachment of the head model to the body model we need to use
a little magic again, as this information is hard coded in the
source code. During run time, the game will load a lot of
information for attaching the models onto special places of other
models. These places are called
tags
. Our magic information tells us that there is a tag called
tag_head
on the body model. Tags are represented as empties
with the prefix tag_
and display type ARROWS
within
Blender.
Let's go into the collection for the body model and find this
tag, just so we see how it looks like.
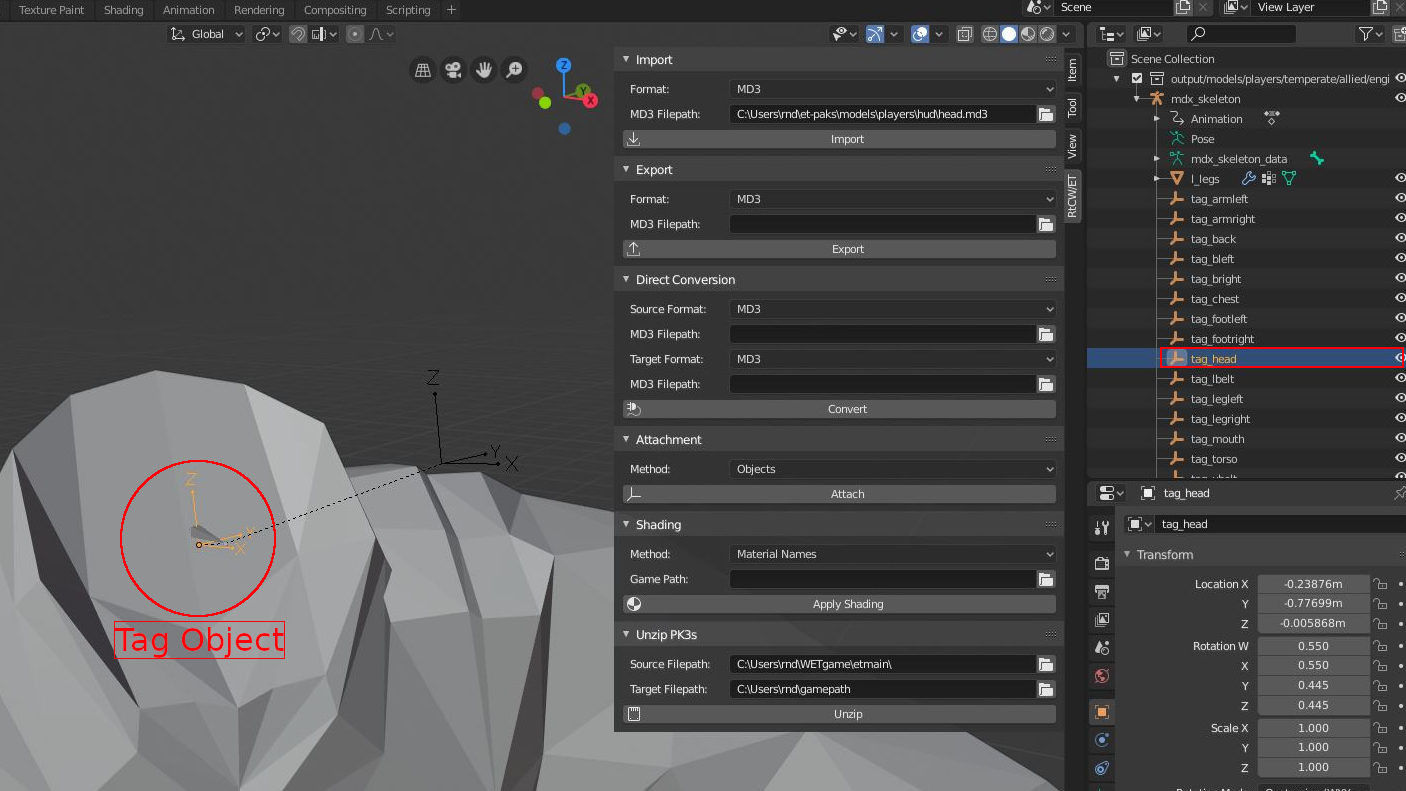
There are 3 kind of tags within the model formats. This one is
attached to a bone with an offset. But there are also tags for
bones without an offset and tags without any parent. We will
attach the head model to this tag object by using the
Attachment Panel. As the
method for attachment we choose Collection
.
The method we chose attaches the objects within a selected
collection to an active tag object.
First deselect everything, then select the collection for the
head model and then select the tag object called
tag_head
to make it active. It is important that you select the tag object last, as only
the active object will be considered a tag object by the addon.
Click the Attach Button. The result is
that all objects of the collection (our head collection) will be
parented (or attached) to the tag object.

Importing and attaching accessoires
W:ET uses .skin files to configure the
information for accessoire models of the body model. It is usually
located at the same place of the .mdm file we just imported. Let's
take a look at models/players/temperate/allied/engineer
and
beside the .mdm file in this folder you will also find a .skin
file called body_engineer.skin
. The file encodes shading and attachment information.
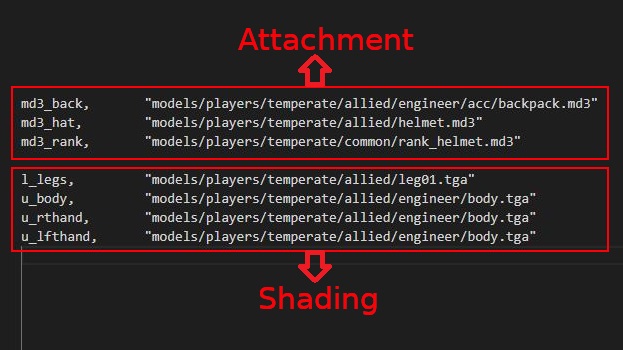
The information is made up of
key-value pairs. For example
md3_hat
defines the helmet model found at
models/players/temperate/allied/helmet.md3
. This helmet
model is supposed to be attached to a tag object. Unlike the
information for shading which describes real surface names (for
example l_legs
), the name for the tags are again ...
magical. You have to browse the source to find out the actual
name. For example md3_hat
maps to tag_mouth
. To make
it a bit more confusing, tag_mouth
is actually located in
the head model, not the body model.
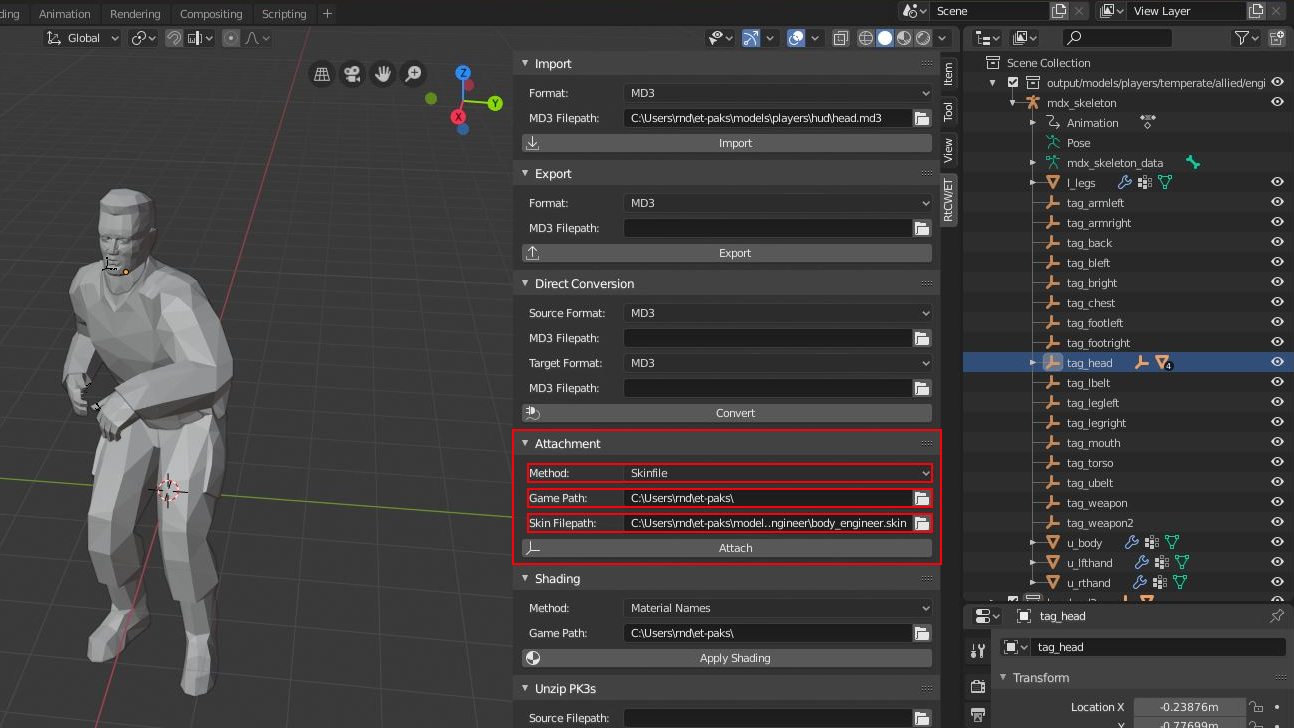
The addon provides a method to read these .skin files and
automatically import and attach the accessoire models. Go to the
Attachment Panel of the addon and
switch the method to Skinfile
. For the input field called Game Path
enter the path to
your game data. This is usually the etmain folder containing all
extracted .pk3 files. We prepared this folder in chapter
Extracting the game data. For the
input field called Skin Filepath
choose the absolute path to the skin file from above. It's
relative path is:
models\players\temperate\allied\engineer\body_engineer.skin
.
Deselect everything, then select the body collection
to make it the active collection, and
click the Attach Button. Your models
will then be imported and attached to the appropriate tags from
the body model. We need to fix the helmet attachment, because as
mentioned, the helmet references tag_mouth
from the head
model, not the body model.
In the Attachment Panel switch the method again to
Collection
.
Then proceed like in the previous chapter
to attach the helmet collection to the tag object called
tag_mouth
from the head model. The same goes for the rank
model. It too attaches to tag_mouth. The result should look like
this:

Shading
Shading just means we tell the game how to put color on the
surfaces (in Blender these are the individual objects) of the
model. It basically defines surface properties which tell the game
how light interacts with the surface, for example to make it
transparent, or to use multiple textures and blend them together.
The game uses so called
shader names
for that.
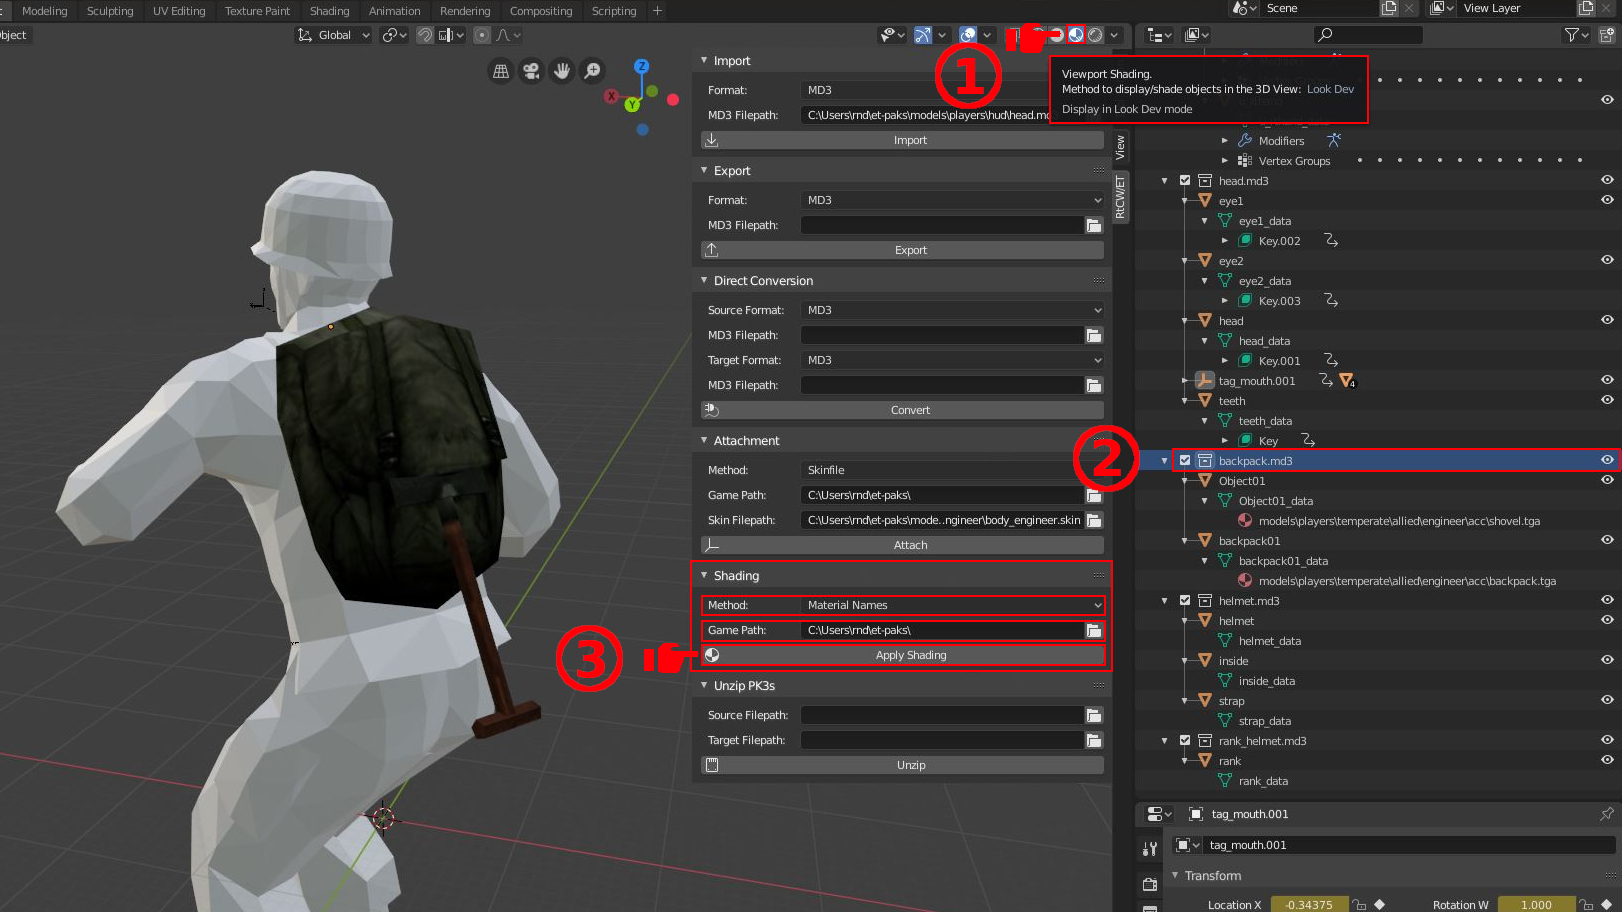
In this addon, the shader name of a surface is encoded into the material name of an object inside Blender. If there is no material after import, then this is totally normal. This just means the game uses .skin files to shade the model. If we look at our imported models in Blender and expand their outliner views, then we can see that only the backpack model contains materials. Note the names of the materials, these are relative paths to the game path.

The Shading Panel therefore provides
two methods: shading by "Material Names" or shading by "Skinfile".
Let's do the shading by material names first. In the Shading
Panel, the
input field called Game Path
should be already set from the
previous chapter. To
see the shading, we must
switch Viewport Shading
to Look Dev
mode. Then we
select the backpack collection to make it active
and click the Apply Shading Button in
the Shading Panel.
Now for that shader name again. This is a reference to either a texture or shader script. Shader scripts are made up of small code snippets defining surface properties. Each code snippet is headed with a shader name. If the game does not find such a shader name in one of these script files, it will resort to finding a texture with that name. First it will search for .tga files, then for .jpg files. That is how the game finds its color info for the surfaces of the model.
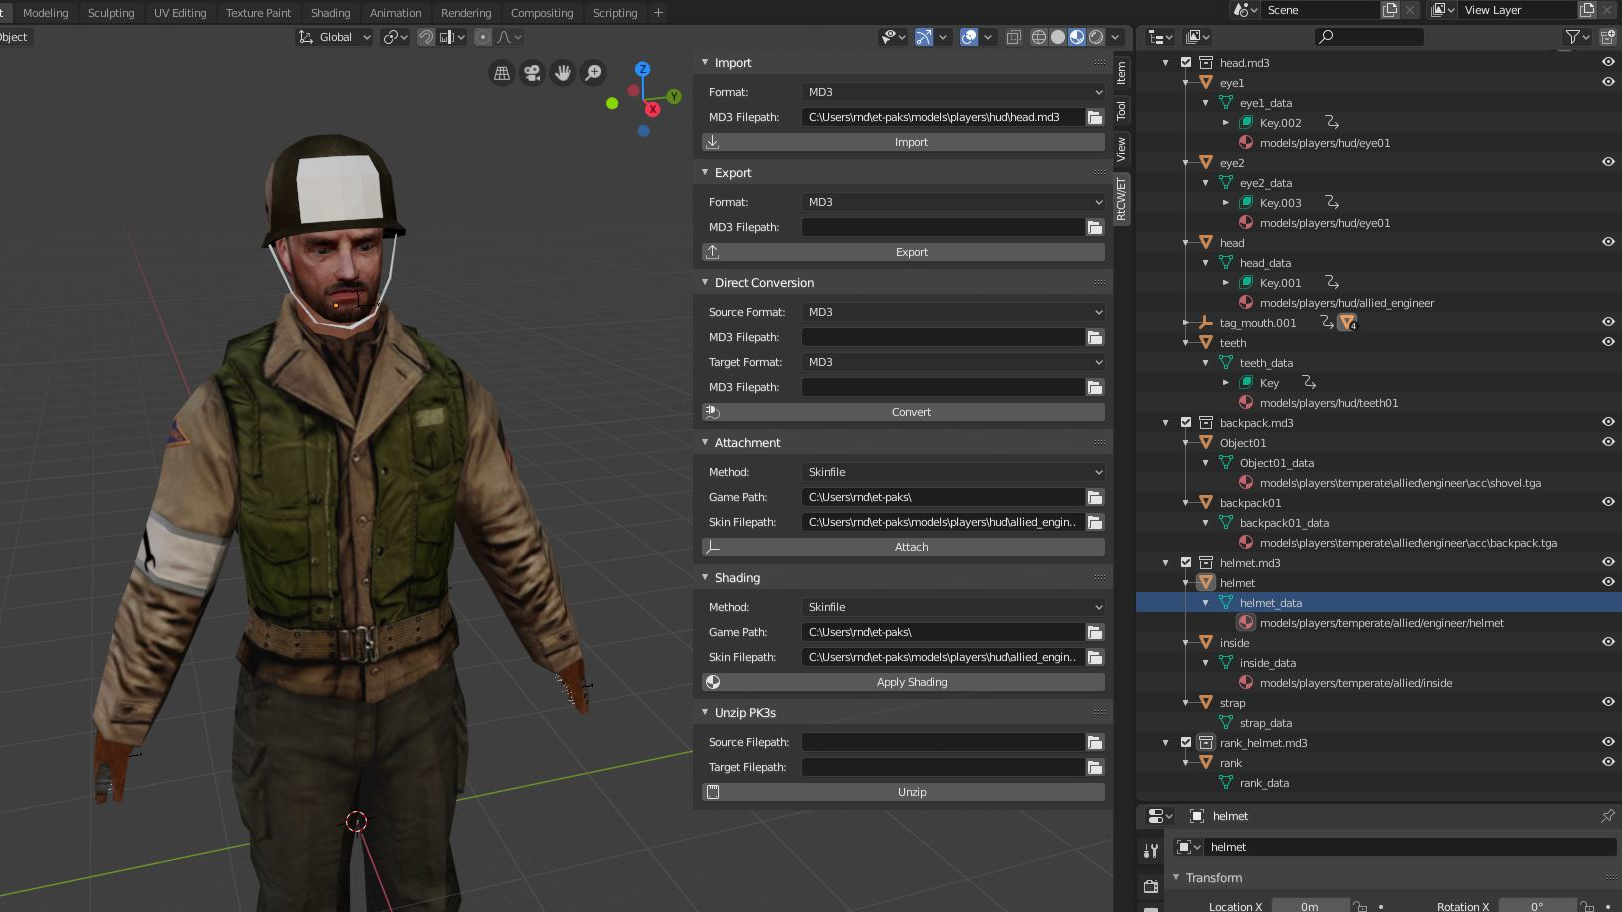
We need to use .skin files to shade the rest of the objects. The .skin files are usually located in the same directory as the model itself. Here are their locations. Remember to use the absolute path.
- helmet: models/players/temperate/allied/helmet_engineer.skin
- head: models/players/hud/allied_engineer.skin
- body: models/players/temperate/allied/engineer/body_engineer.skin
Shading by Skinfile works the same way as with material names, that means we select the collection to make it active, fill in our input fields, and click the button. The addon will then read the .skin file information and apply the shading. After doing this for all three collections we get the additional shading information.
There are two surfaces which we or the addon did not shade: its the strap surface of the helmet, and the rank model itself. The strap surface shading is a limitation of the addon: it simply can't read shader scripts yet. We have to manually do that in Blender if we want to. The rank model is shaded dependent on the rank of the player ingame and this information is hardcoded within the source code.
Fixing the strap surface
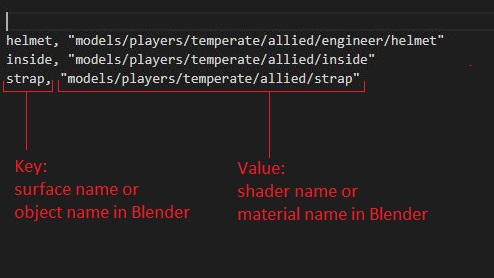
The shader name for the strap surface is defined in the helmet_engineer.skin file. This is a good time to explain how shading works for .skin files, because as we saw above, a .skin file can also contain information about attachment. A .skin file uses key-value pairs to do the shading for a model. The key is be the object name (or surface name as the game calls them), and the value is the shader name.
The strap surface has a
shader name called
models/players/temperate/allied/strap
. After searching all .shader files from the game we can find out
that this shader is located in a file at:
scripts/models_players.shader
. The shader script has 2
lines: the first line tells the engine to draw the surface from
both sides (culling disabled). The second line contains the
reference to a texture. We will use that texture for shading.
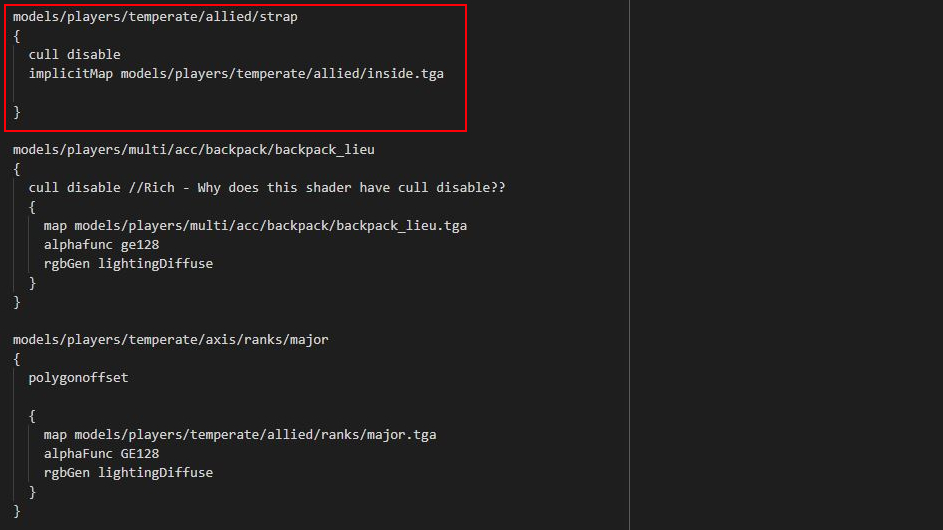
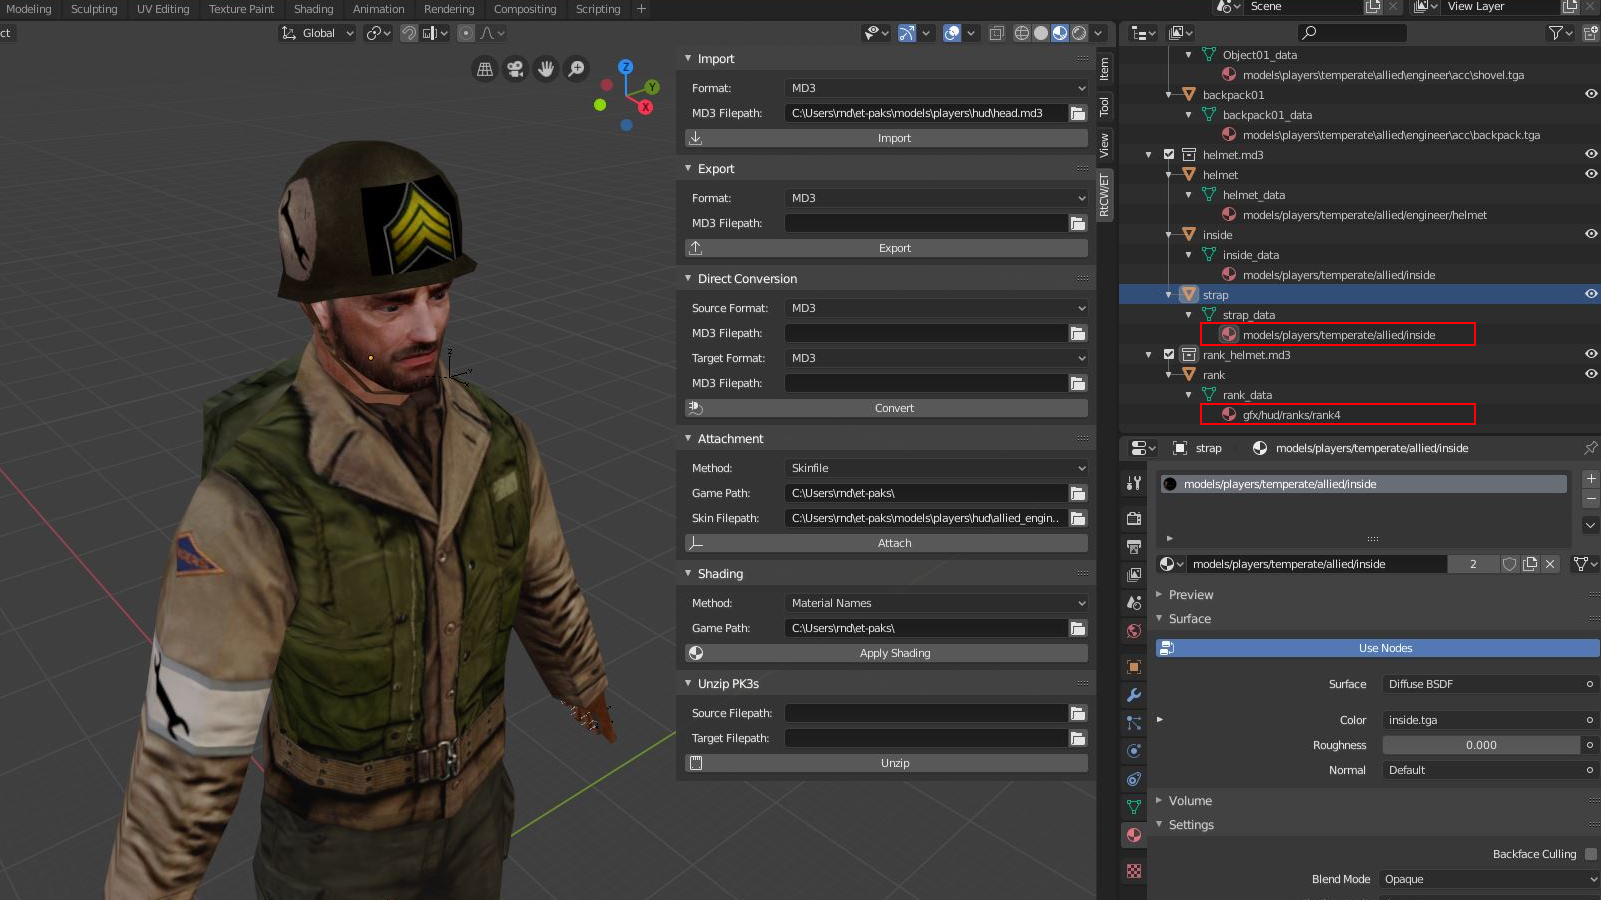
As already mentioned, the addon does not support reading shader
scripts, so we just copy the path to the texture which is:
models/players/temperate/allied/inside
. As it happens, this shader name already exists in our current
set up, so we just assign this material in Blender to our strap
surface.
Fixing the rank model
The rank model uses multiple shaders, because each time a player
ranks up in xp, another shader is drawn. For that reason the
shaders are hard coded inside the source code and change
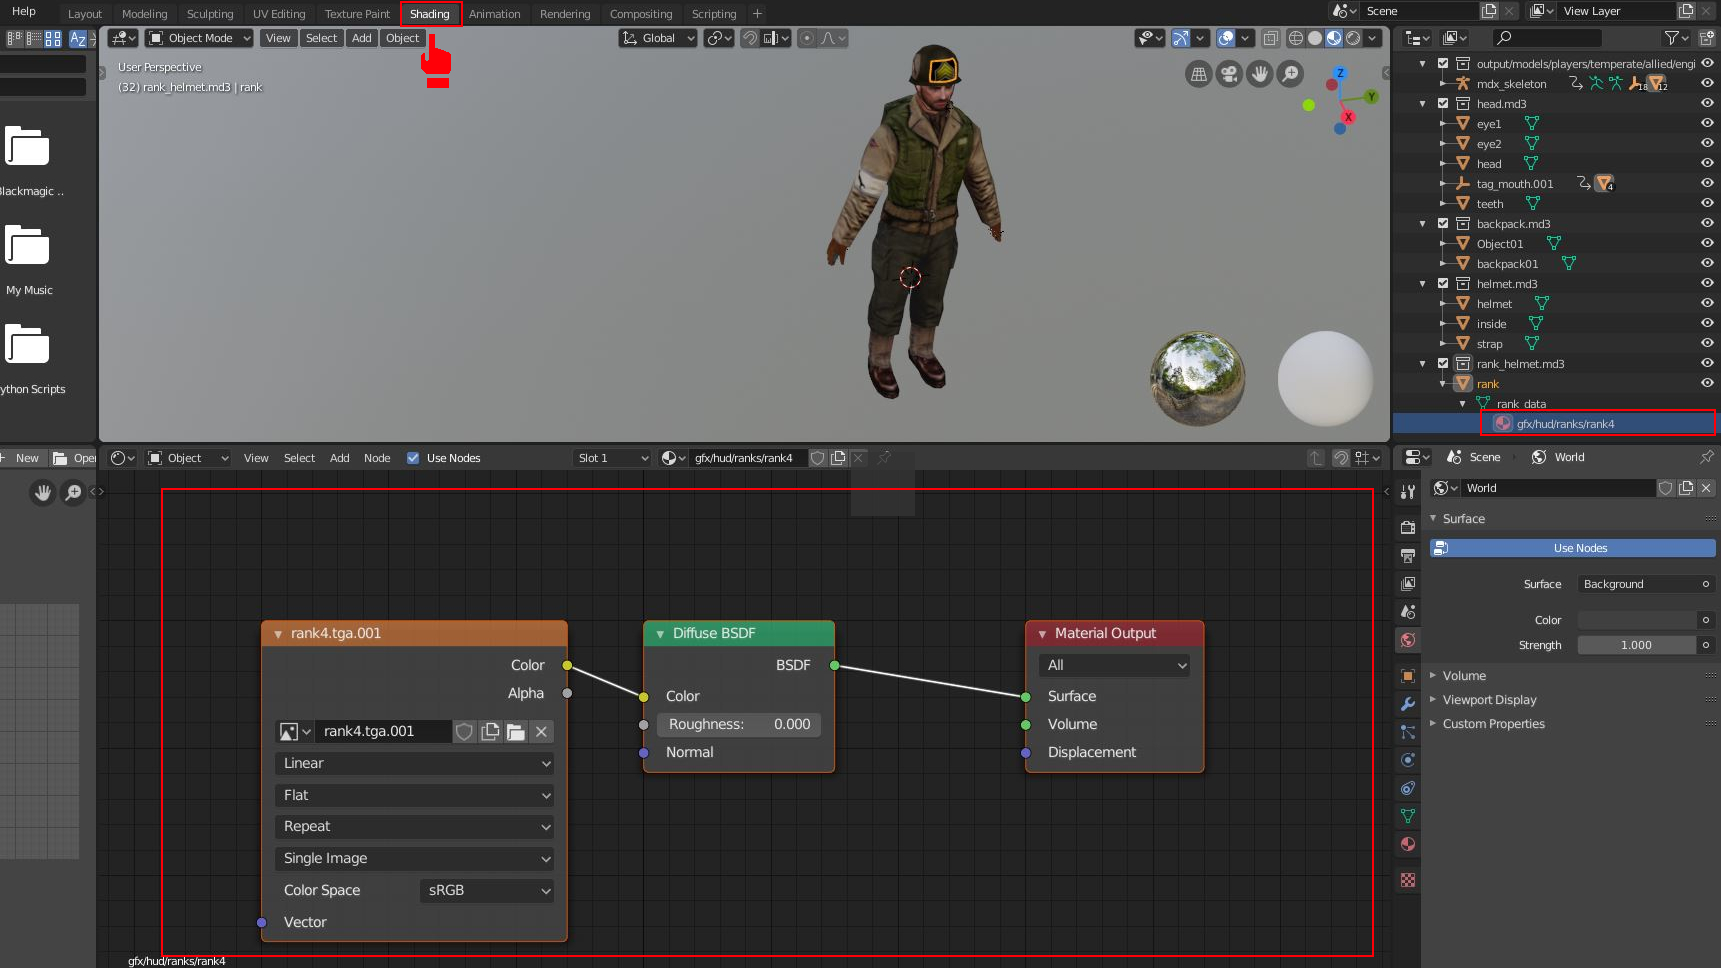
dynamically. Let's apply some magic again and
use the shader name gfx/hud/ranks/rank4
for the material name of the strap surface. After using the
Shading Panel
again we see that the rank model is shaded by
the texture, but the
texture is meant to be transparent.
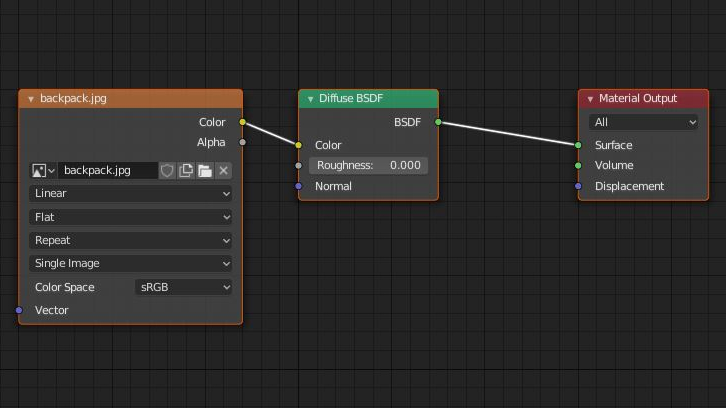
To apply our last fix we will open up the
Shading Workspace. After opening the
workspace, you will see the
standard nodes the addon wrote. These
nodes get written when you use the Shading Panel
.
To make the texture transparent inside Blender we add a Transparent Shader and a Mix Shader and connect them. Additionally we open up the Settings Panel by pressing 'N' in the node editor and go to Options. There we set the Blend Mode option to Additive.

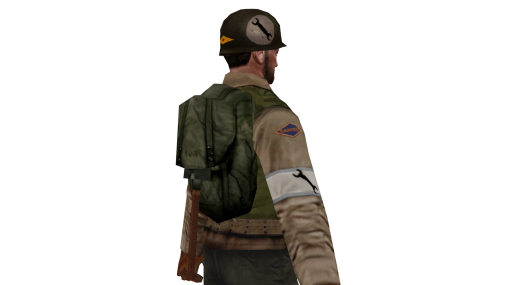
If everything went successful, we have a first basic character going in Blender, ready for screenshots, icons, and the many more possibilities of Blender. That concludes the import example. In the next chapter we will export that same character for use inside the game.
Export of the Character
In this section we are going to export the character from the previous section to an MD3 model. This model will include the bind pose frame, a walking animation, and an idle animation. But before that, let's review what we already have.
What we have
In the previous section we imported, assembled and shaded a complete character from W:ET. We have 5 models: body, head, backpack, helmet and rank.
As we used the shading panel to shade the model in Blender, we now have all shader names in Blender. These are represented as material names. We will keep on using these material names for export. The alternative is deleting them all again and use the object names inside .skin files for shading, or a mixture of both.
The body model and the head model are the only models which contain animation. The body model is animated by a skeleton. The head model is animated by shape keys. Since we export to MD3, this is totally fine. The skeletal data will just be converted.
Additionally, we should probably clean up our tags. You might have noticed that some names, for example "tag_mouth", end with ".001". Also, since we don't plan on using them anymore, we should exclude most of them, if not all, from the export by making the objects invisible. But for now we leave everything as is.
Preparing the animations
Before we export, we must prepare our animation data. We have to choose which frame ranges we want to include, and modify the existing animations so that only a couple of animations are exported.
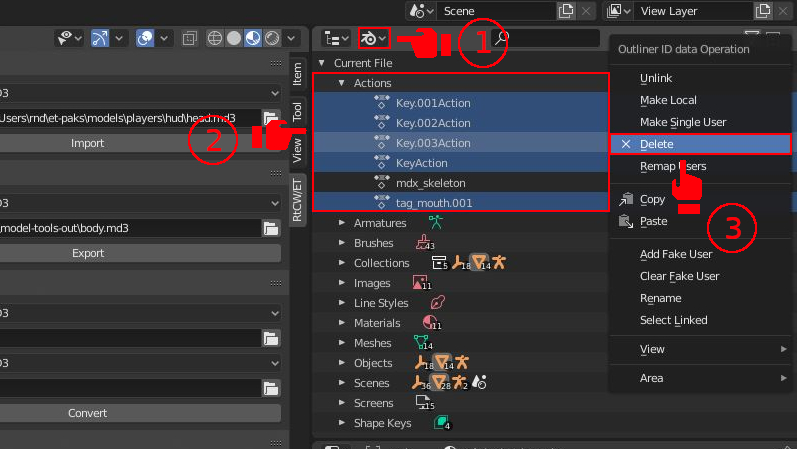
Deleting existing animations
We do not need the animations for the head model, so we will
remove them. The imported animations are stored as actions inside
Blender. We can delete them in the
Outliner editor type. There we switch
the Display Mode to Blender File,
locate the Actions tree, and delete
every action except the mdx_skeleton
action. We delete the
actions by selecting them, right clicking the marked context, and
clicking Delete
.
Choosing frame ranges
Animations for models are referenced by
.anim script files by the game. We can
look into these files to get an overview. For the head model the
script file is located at: animations/human/head/base.anim
.
For the body model it is located at:
animations/human/base/body.aninc
.
From our body animation we want the bind pose frame, an idle state and a walking state. After opening the file for the body animation we choose the following frame ranges:
| Animation Name | Start Frame | End Frame | Duration |
|---|---|---|---|
| relaxed_idle_no | 1094 | 1312 | 219 |
| relaxed_walk_1h_2 | 1458 | 1553 | 96 |
Additionally, we pick frame 32 for the bind pose frame.
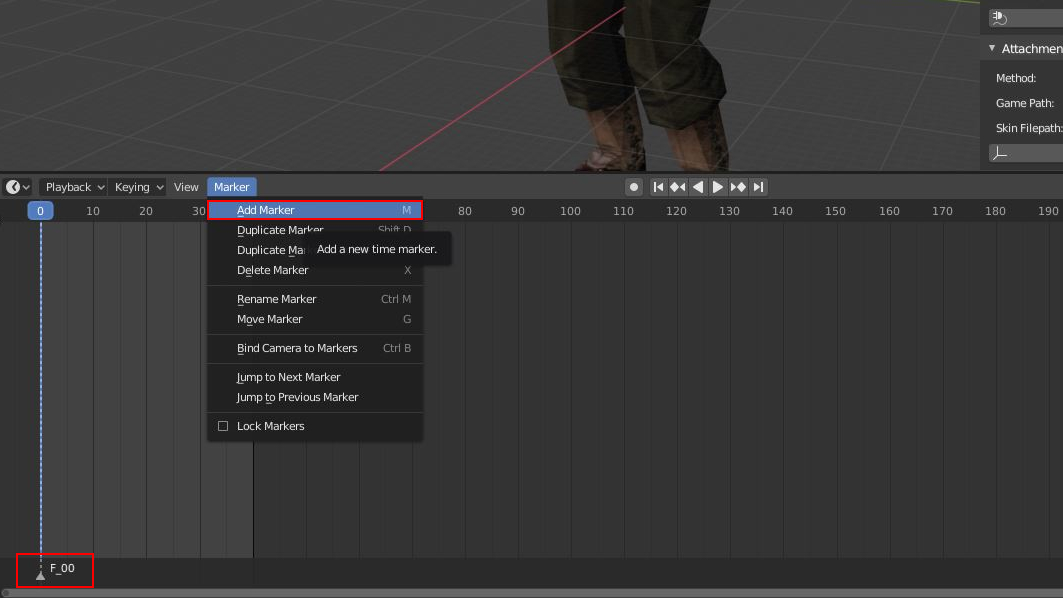
Editing frame ranges
We need to delete and move certain keyframes. For deleting the key frames we use markers. The markers will help us to select all key frames in between them, so that we can delete them. To set a marker go to the Marker menu in the time line and click 'Add Marker'.
We put markers on the following frames: 0, 31, 33, 1093, 1313, 1457, 1554, 4862.
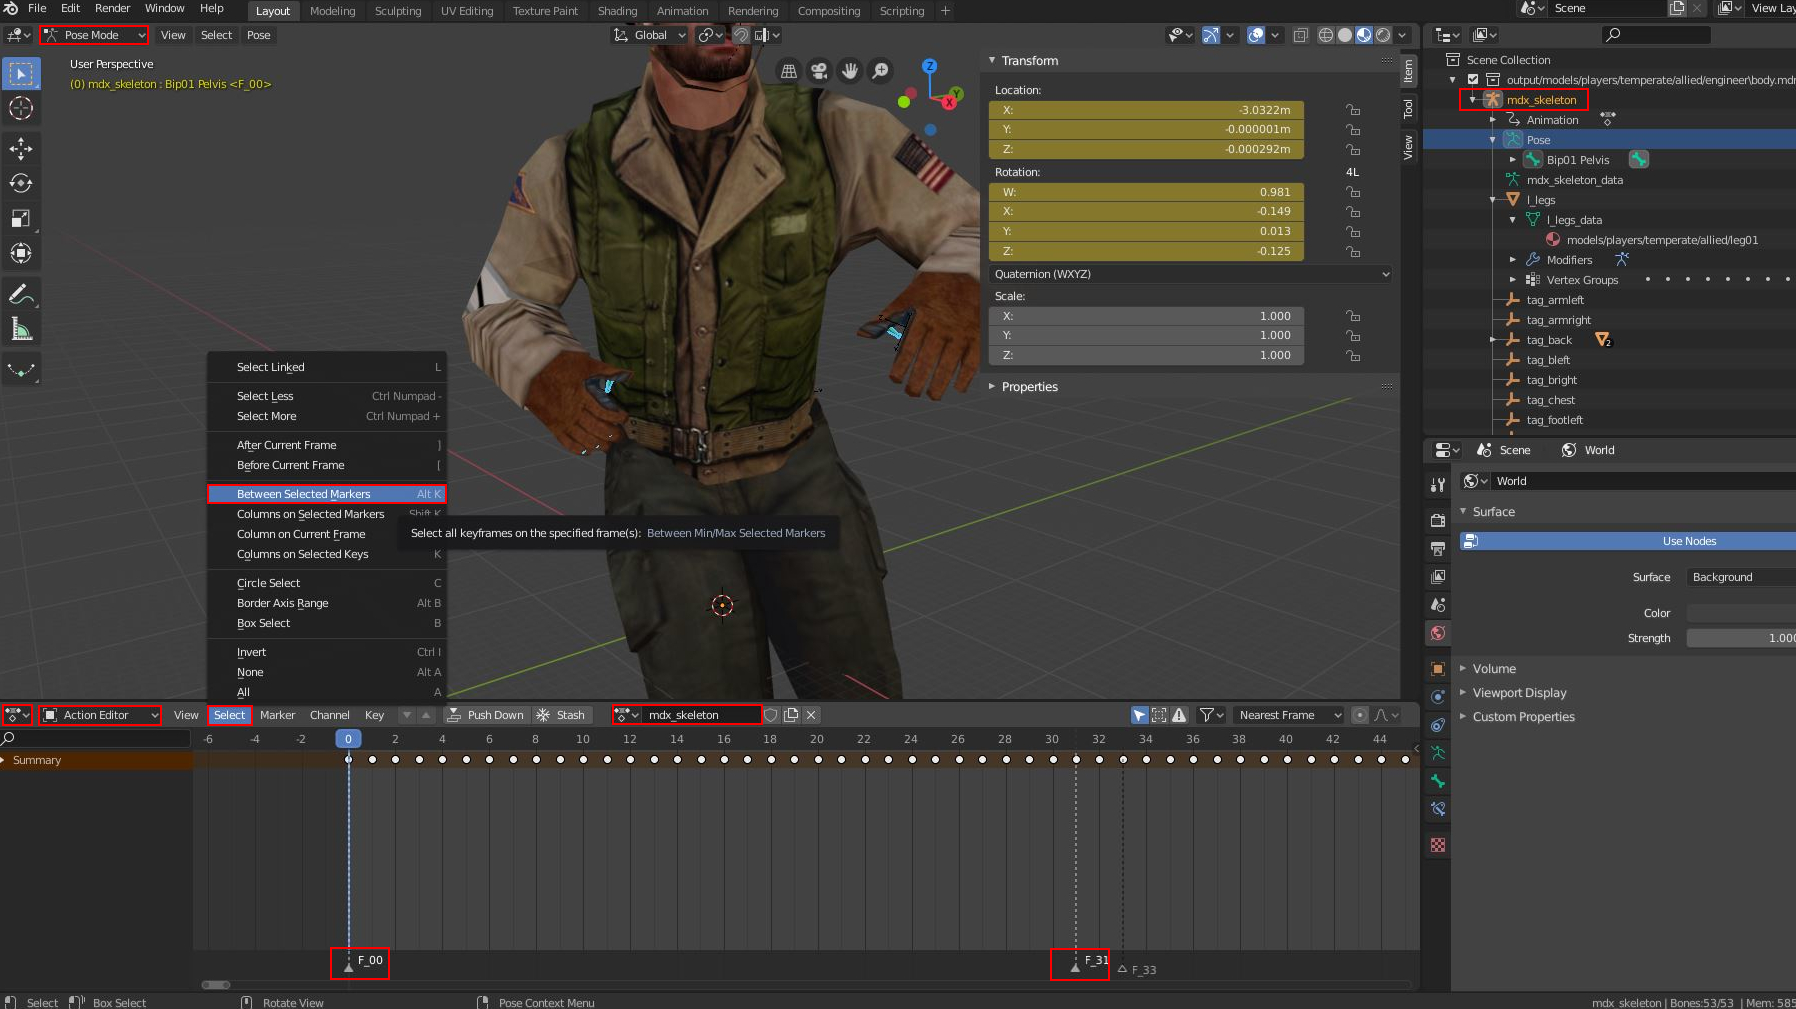
Next, we need to
switch our editor type from Timeline
to
Dope Sheet
. Inside the Dope Sheet Editor we
switch to Action Editor and
select the Action called mdx_skeleton.
Then we select all pose bones by
selecting our armature object, switch to pose mode, and select
them all. Finally
select the markers at frame 0 and 31,
go to the Select menu
and
click Between Selected Markers
. The selected key frames can now be deleted.
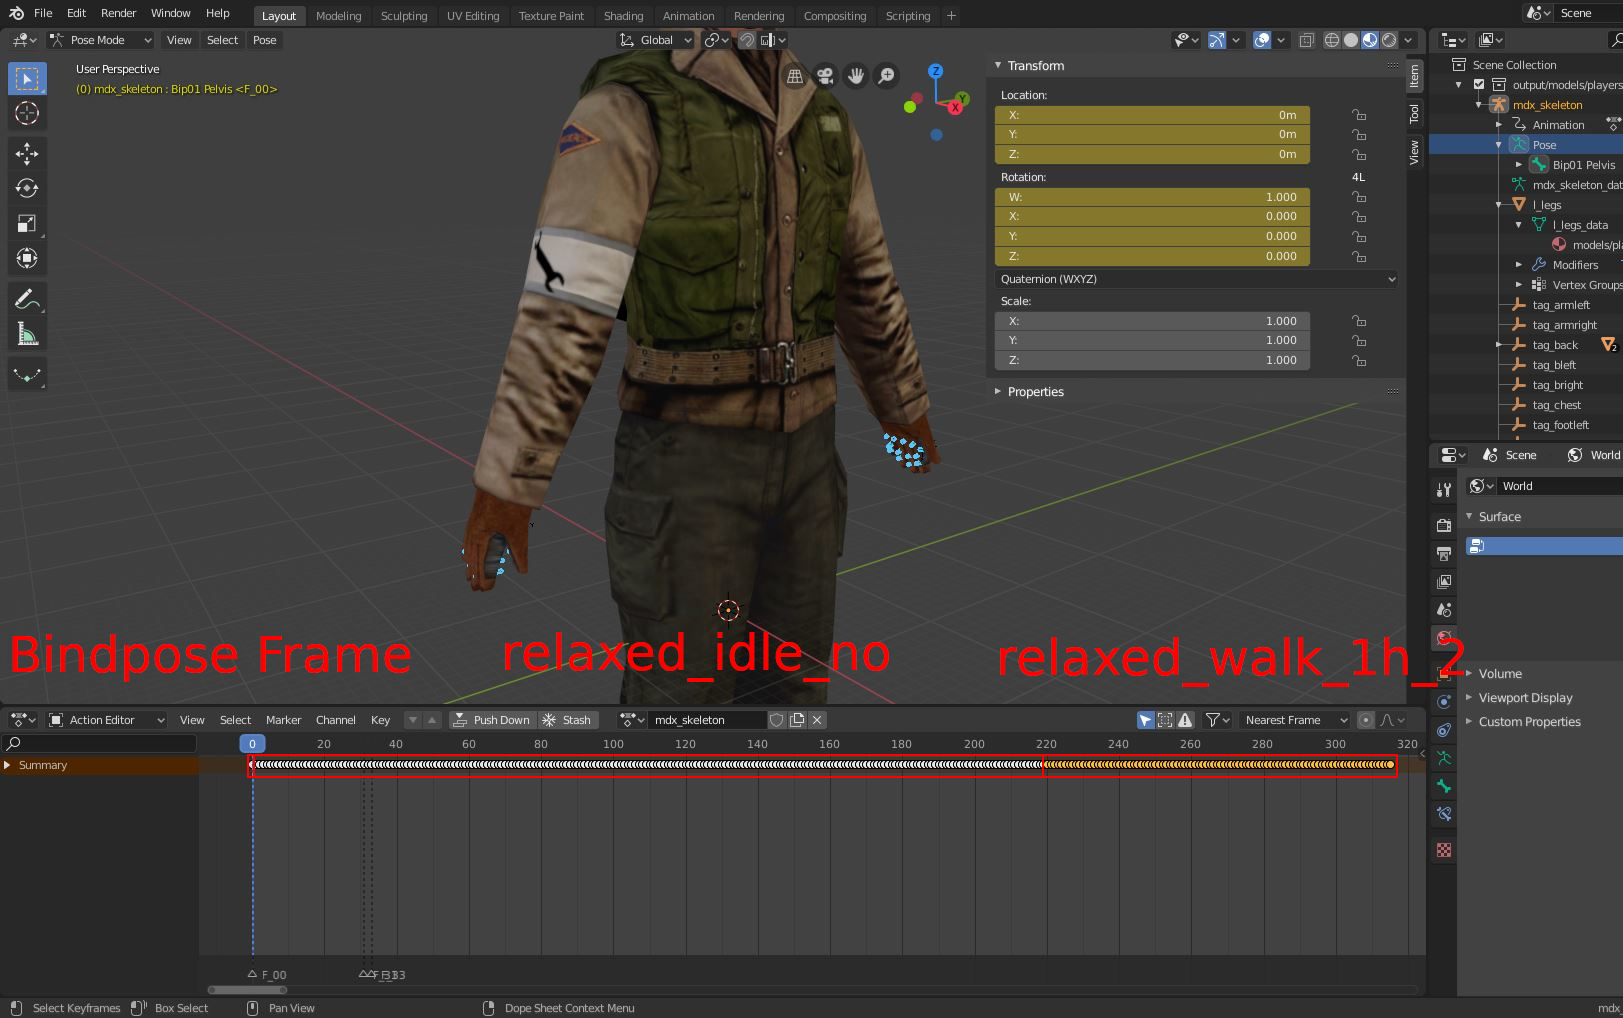
After doing that for all our frame ranges, we have only 2 animations left. We need to move them to the beginning on the time line. We do this by selecting them, and pressing 'G' to drag them around. If everything went successful, you should have your key frames set up, ready for export.
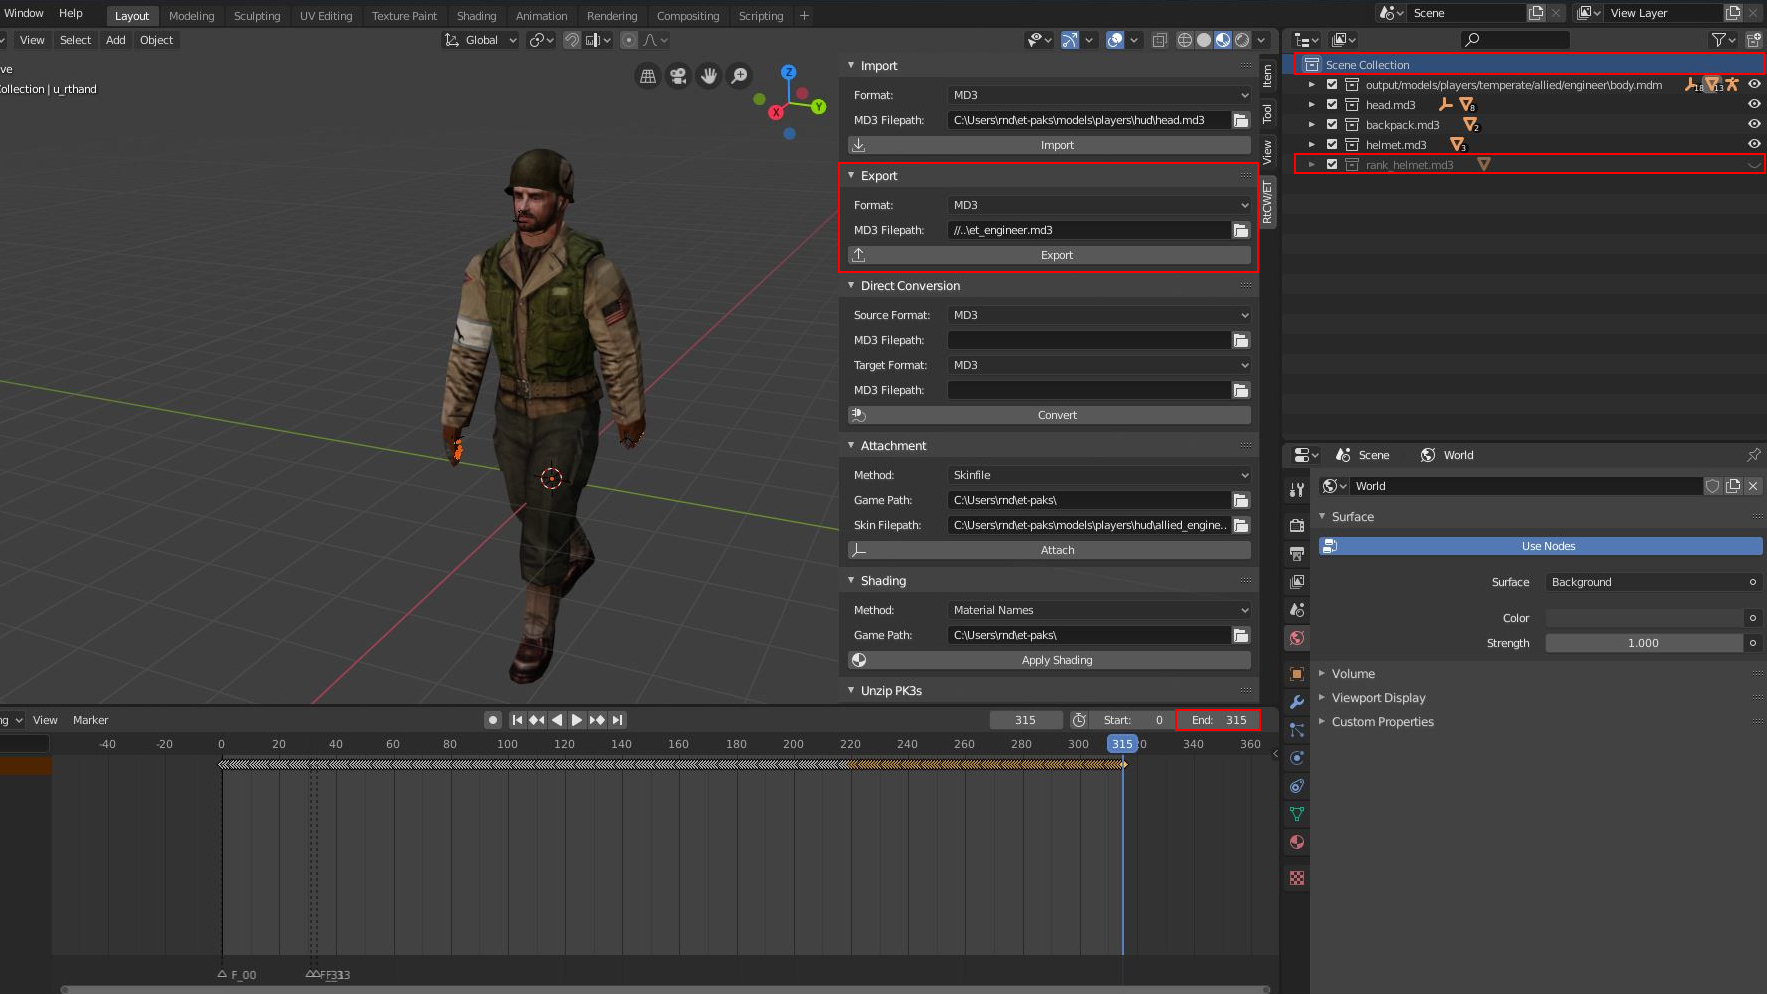
For the export we use the Export Panel. First
set the end frame in the time line (in
our example it is 315). As we do not want to include the rank
model for export, we simply
hide its collection in the outliner.
Finally,
fill in the panels input fields,
select the top level collection called
Scene Collection
and
click the export button.
That concludes the export example. You can download the final character here if you want. In the next chapter we are going to delve into export in more detail.
Export
This chapter describes how to create and prepare a new model for export. It also gives an overview of the Blender data which will be considered by the addon.
Blender Data
During export, the addon will scan for mesh objects, armature objects and arrow objects in the active Blender collection and all its sub-collections. The following gives an overview of the Blender data it might consider.
Mesh Object
| Data | Description |
|---|---|
| object transforms | Location, rotation, scale. Includes animation. |
| name | Used for .skin file shading. |
| vertices |
|
| faces | Have to be triangulated. |
| uv maps |
|
| materials | Only the material name will be exported. The material name will be the shader name for the surface in the export data. Nodes from the node editor will not be considered. |
Armature Object
| Data | Description |
|---|---|
| object transforms | Only location, rotation. Includes animation. Scale is not supported. |
| edit bone: name | Will get mapped to the bone name. |
| pose bone: object transforms | Only location, rotation. Scale is not supported. |
| pose bone: 'LIMIT_DISTANCE' constraint | Needs to be present. This is a format requirement. |
| pose bone: 'Torso Weight' custom property | Needs to be present. Can be found in the "Bone" context in the properties window under "Custom Properties". |
| pose bone: 'Torso Parent' custom property | Needs to be present on only 1 bone. Can be found in the "Bone" context in the properties window under "Custom Properties". |
Arrow Object
| Data | Description |
|---|---|
| object transforms | Location, rotation, scale. Includes animation. If parented to a pose bone, the tag must not be animated. |
| display type | Needs to be set to 'ARROWS'. |
| name | Will get mapped to the tag name. Must start with "tag_". |
| 'Torso Weight' custom property | Needs to be present only if export to MDS. |
MD3 and MDC
MD3 and MDC are both morph based formats. You can prepare your model in Blender and export to both of these formats without problems. However, you can not export to MDS or MDM/MDX, because these require a skeleton.
Basic
The steps are: create the geometry (a cube for demonstration), triangulate it, uv unwrap it, add a material to it and name the material according to the conventions.
For the material name the addon expects a path relative to the game path. This path is called a "shader name" by the game. It is either a script located in .shader file, or it is just a .tga or .jpg texture. For this example we use: "textures/props/box_m05a".
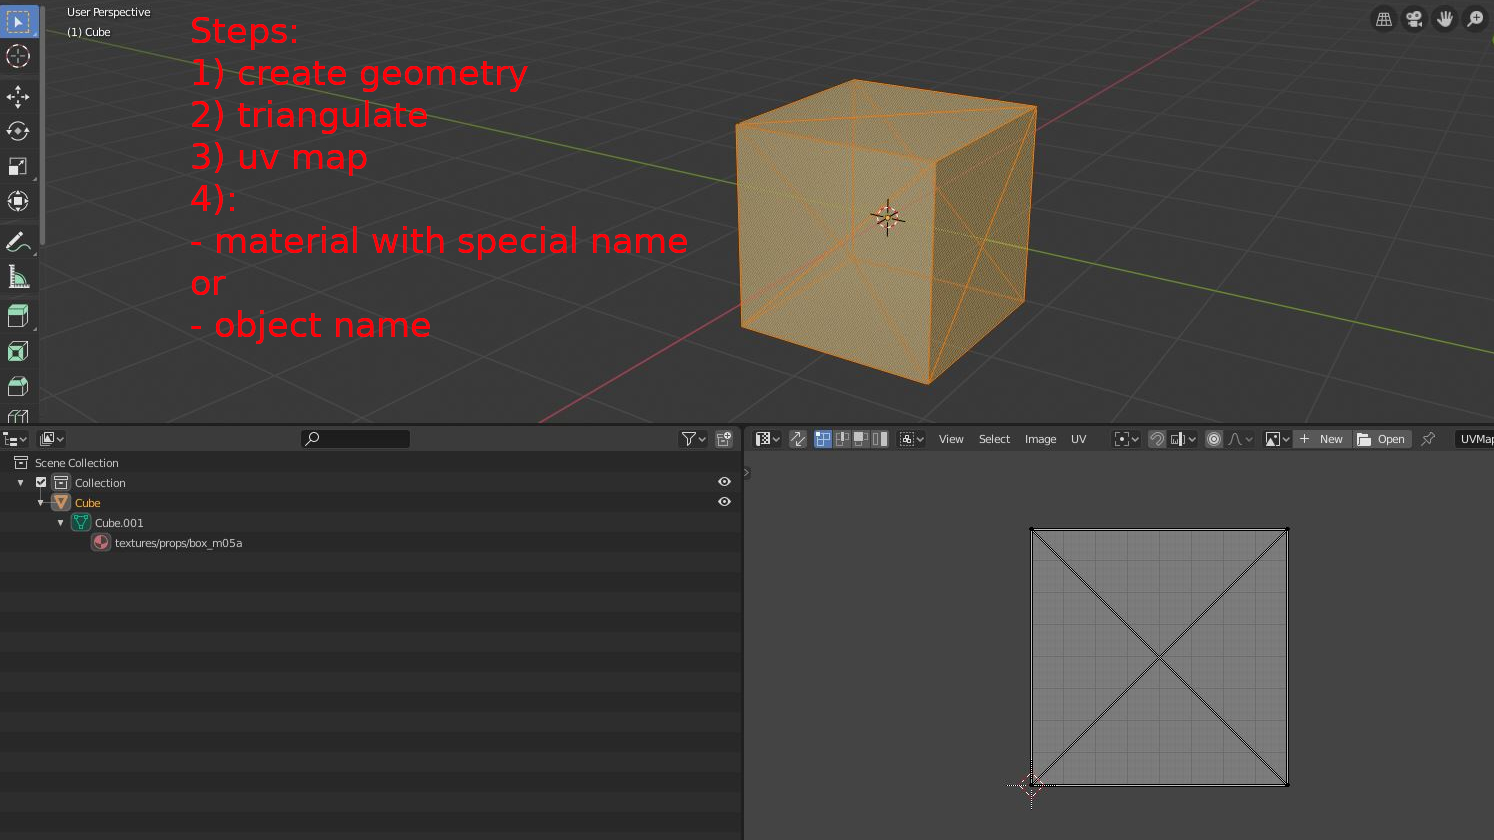
If you want to use .skin files instead of material names for shading, you there is no need for a material with a special name, because in that case, the object names become important.
Animation
Animation can be done by using absolute shape keys (relative shape keys are not supported) or object transforms. If you do not need animation, just set your frame count to 1 in the timeline, but you can also export multiple, static frames.
Before you animate with shape keys make sure you have triangulated your objects geometry, because Blender does not support triangulation after the object has been shape keyed.
Tags
Tags are represented as Empty objects in Blender. They need to have display type 'Arrows' and their name needs to start with 'tag_'. Tags can be parented to any other object.
Some models exclusively contain tags, for example first person models. Therefore the addon supports exporting tags only.
Export
To export your model, just make the collection containing your objects active and then use the export panel. The addon will read all objects contained in the collection and sub-collections. If you want to exclude certain objects, just make the object invisible in the viewport.
MDS and MDM/MDX
MDS and MDM/MDX are both skeletal based formats. You can prepare your model in Blender and export to all of the formats, even morph based ones.
Basic
The steps are: create the geometry (a cylinder for demonstration), triangulate it, uv unwrap it, add a material to it and name the material according to the conventions. Then create an armature and parent your object to the armature. Make sure that each vertex has a maximum of 3 weights. This is a format requirement.
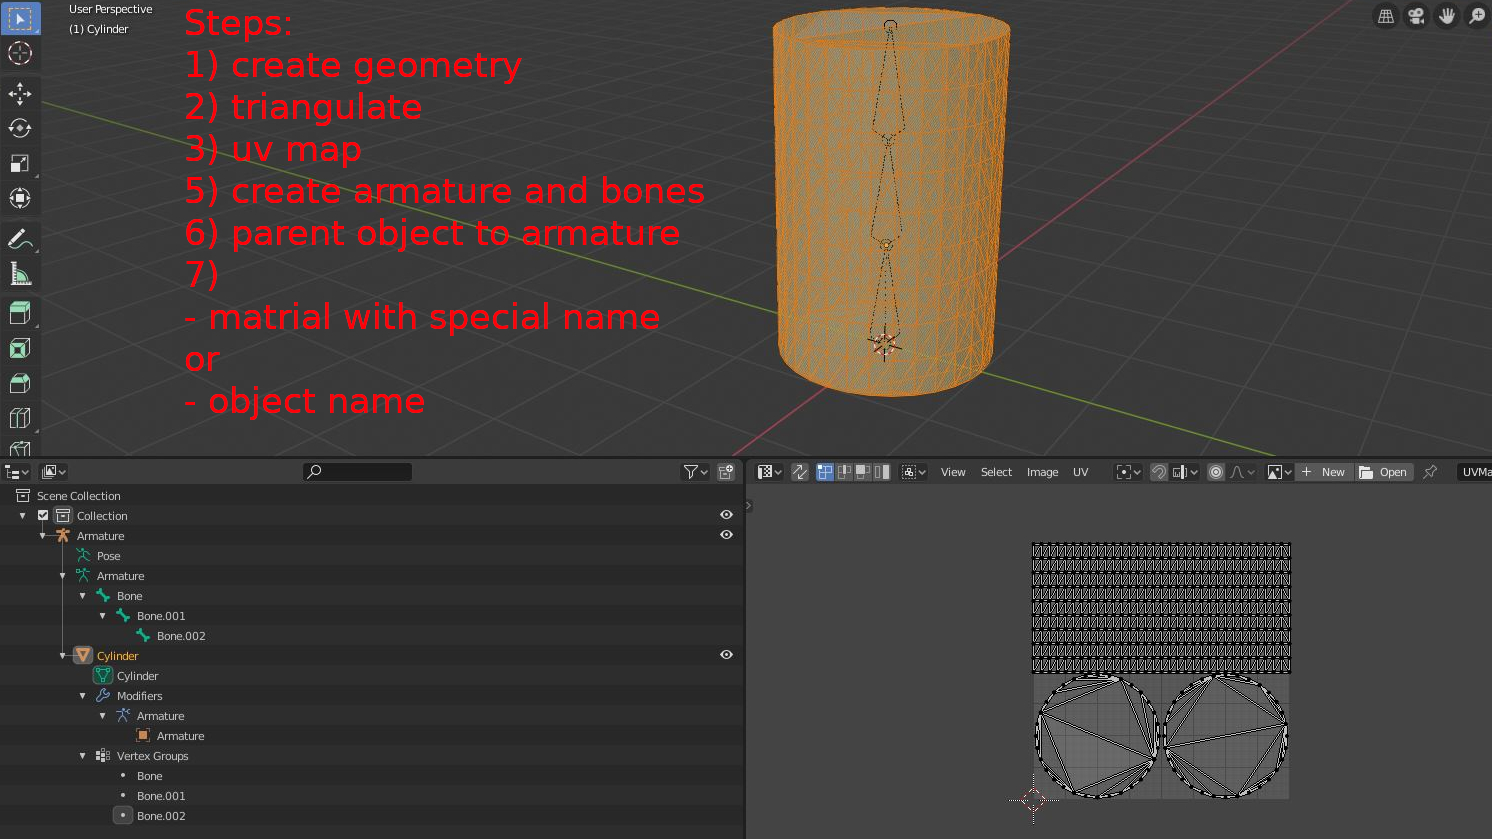
See chapter MD3 and MDC - Basic for more details on the material name conventions or using .skin files.
For the bones: these will need a "Fixed Distance" constraint on each pose bone. Additionally all bones should have a "Torso Weight" property and on one of them there needs to be a "Torso Parent" property present. See section Blender Data for more details.
Animation
Animation is done exclusively by animating pose bones or animating the object transforms of the armature. You can not use shape keys alongside skeletal animation, nor can you animate tags themselves (they need to be animated by the bone). There might be problems with scaling the armature. See section Armature Scaling for more details.
If you do not need animation, just set your frame count to 1 in the timeline, but you can also export multiple, static frames.
Tags
Tags are represented as Empty objects in Blender. They need to have display type 'Arrows' and their name needs to start with 'tag_'. Tags can be parented to any other object, but if you export to MDS or MDM/MDX you need to have your tags parented to a pose bone. Additionally, the tag itself can not be animated, the formats require the parent bone to animate the tag.
Tags exported for MDS additionally need a "Torso Weight" property. See section Data Overview - Arrow objects for more details.
Export
To export your model, just make the collection containing your objects active and then use the export panel. The addon will read all objects contained in the collection and sub-collections. If you want to exclude certain objects, just make the object invisible in the viewport.
Convertability
If you use the "Direct Conversion" Panel or are exporting a model prepared in Blender, then the addon converts your data in a best effort. In a nutshell: you can export or convert your data into all directions except for MD3 and MDC to MDS and MDM/MDX. The reason is that MDS and MDM/MDX require a skeleton to animate their vertices and tags. MD3 and MDC do not contain skeletal data. Reconstructing this data is not easy.
The following graph gives an overview.
Panel Description
This chapter describes the panels, its input fields, and expected results.
Import
The import panel allows for import of models.
Input Fields
| Input Field | Type | Description |
|---|---|---|
| Format | Combobox | Sets the format to import |
| Filepath | Textfield | Path to model file on disk |
| Import | Button | Starts the import operation |
| Bindpose Frame | Integer | Sets the bind pose of the skeleton and therefore the edit mode meshes. Context-sensitive on format input field and optional. |
Results
By clicking the import button the import operation will start. The addon will then read the model data from file and write it into Blender as a collection.
Export
The export panel allows for export of models.
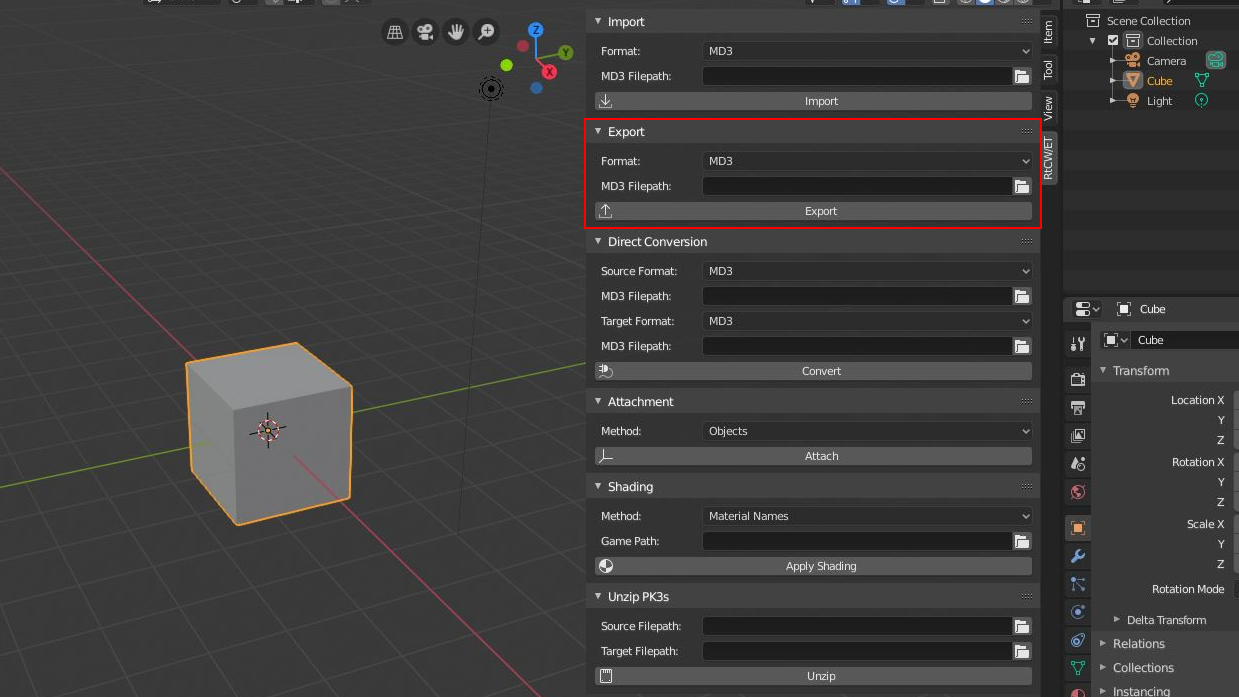
Input Fields
| Input Field | Type | Description |
|---|---|---|
| Format | Combobox | Sets the format to export |
| Filepath | Textfield | Path to model file on disk |
| Export | Button | Starts the export operation |
| Collapse Frame | Integer | Sets the collapse pose of the skeleton. Context-sensitive. The collapse pose is used for the LOD algorithm in MDS and MDM/MDX. It should be a pose with the major joints like knees and elbows bend as far as possible. |
Results
By clicking the export button the export operation will start. The addon will then read all data found in the active collection and all its child-collections. Only mesh-, armature-, and empty objects are considered. Dependent on what format you export to, the model data will be converted in an best effort. See chapter Export for more details on how to set up your blender data.
Direct Conversion
The direct conversion panel allows to directly convert between model formats without writing the data into Blender.
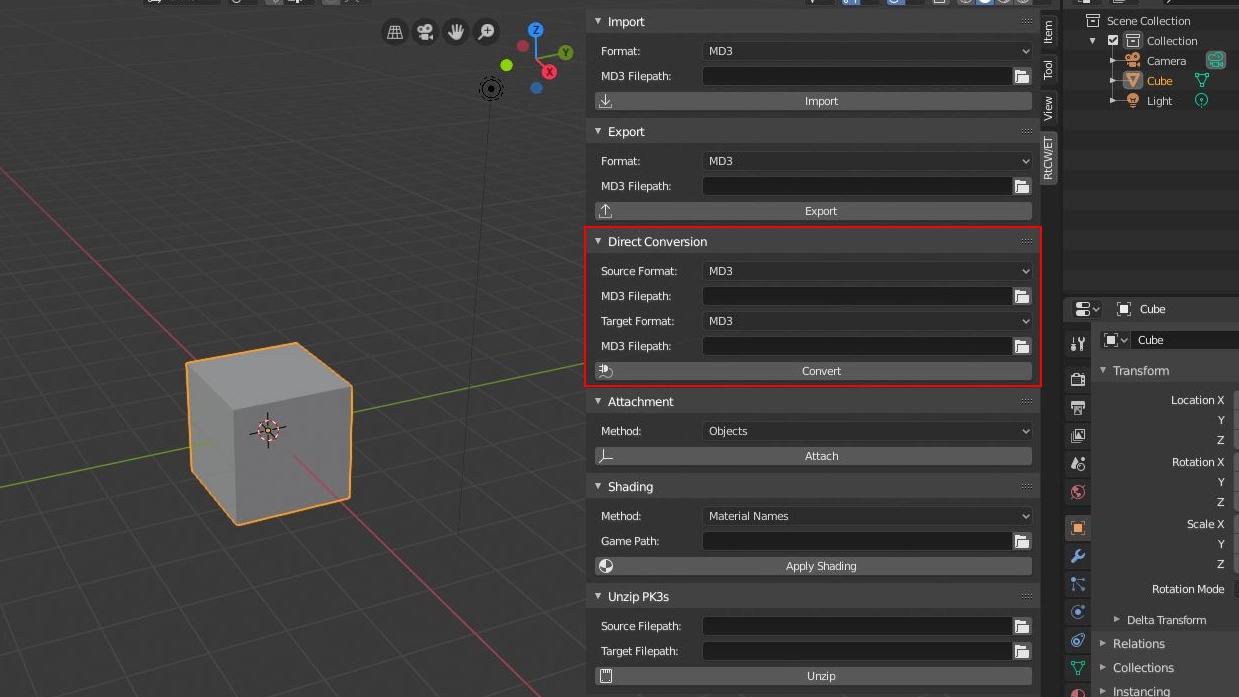
Input Fields
| Input Field | Type | Description |
|---|---|---|
| Source Format | Combobox | Sets the source format to convert from |
| Filepath | Textfield | Path to source model file on disk |
| Target Format | Combobox | Sets the target format to convert to |
| Filepath | Textfield | Path to target model file on disk |
| Convert | Button | Starts the direct conversion operation |
Results
By clicking the direct conversion button the direct conversion operation will start. It will read the source model and then convert and write back to the target format without writing to Blender. See chapter Convertability for more details on which formats can be converted between each other.
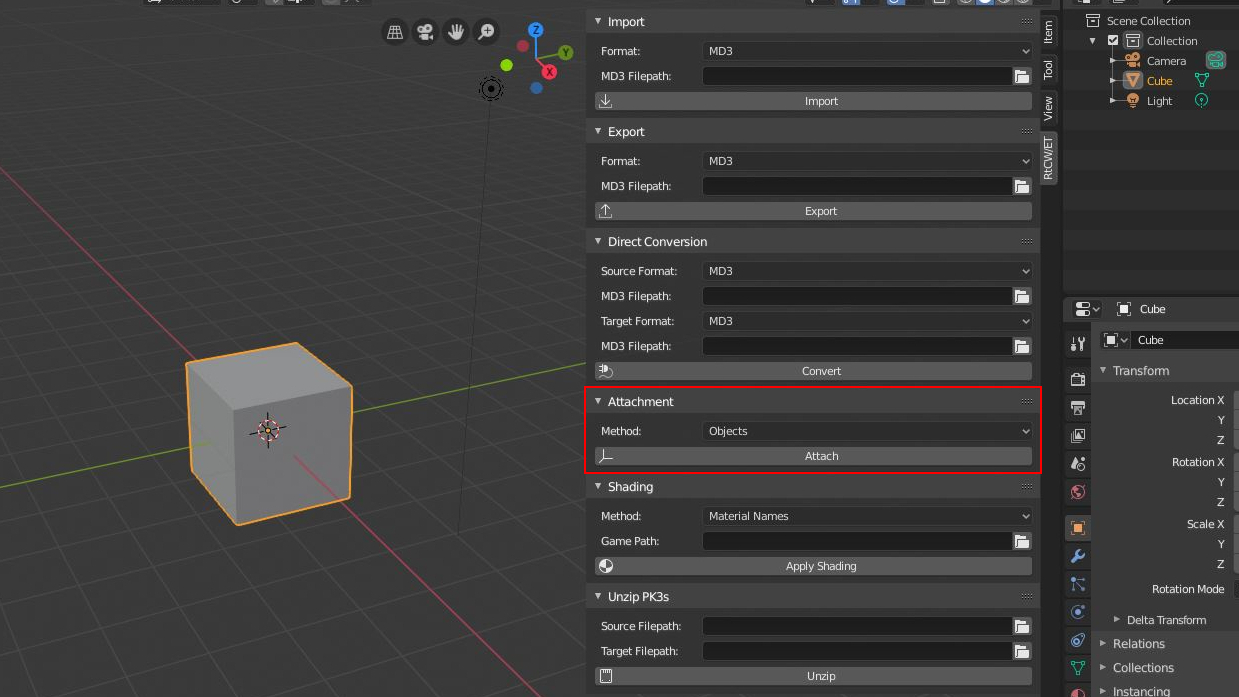
Attachment
The attachment panel allows to attach objects to a tag object inside Blender. It mimics the games attachtotag operation found in mapscripts.
The addon uses different methods for finding the objects for attachment:
- Objects: allows to select a set of objects for attachment. First select the objects, then select the tag object to make it active, then click the "Attach" Button.
- Collection: automatically selects all objects for attachment which are present inside the collection. First select the collection, then select the tag object to make it active, then click the "Attach" Button.
- Skin File: allows to select the models for attachment by using information from a .skin file. All models found in the .skin file will be imported. First select the collection containing the tags, then fill in the additional input fields and click the "Attach" Button.
Input Fields
| Input Field | Type | Description |
|---|---|---|
| Method | Combobox | Sets the method for attachment |
| Attach | Button | Starts the attachment operation |
| Game Path | string | Sets the path to the game data. Context-sensitive. The game data is a folder like etmain in W:ET. It should contain all PK3 files, but extracted, as the addon will not attempt to extract them during the operation. |
| Skinfile Path | string | Sets the path to .skin file data. Context-sensitive. A .skin file contains information for shading or attachment. It consists of a list of key-value pairs. For attachment the key will describe a surface name. The value will describe the model path on disk. |
Results
By clicking the attachment button the attachment operation will start. If successful, it will parent a set of objects to a tag object. It will therefore align the objects origin to the location and orientation of the tag object.
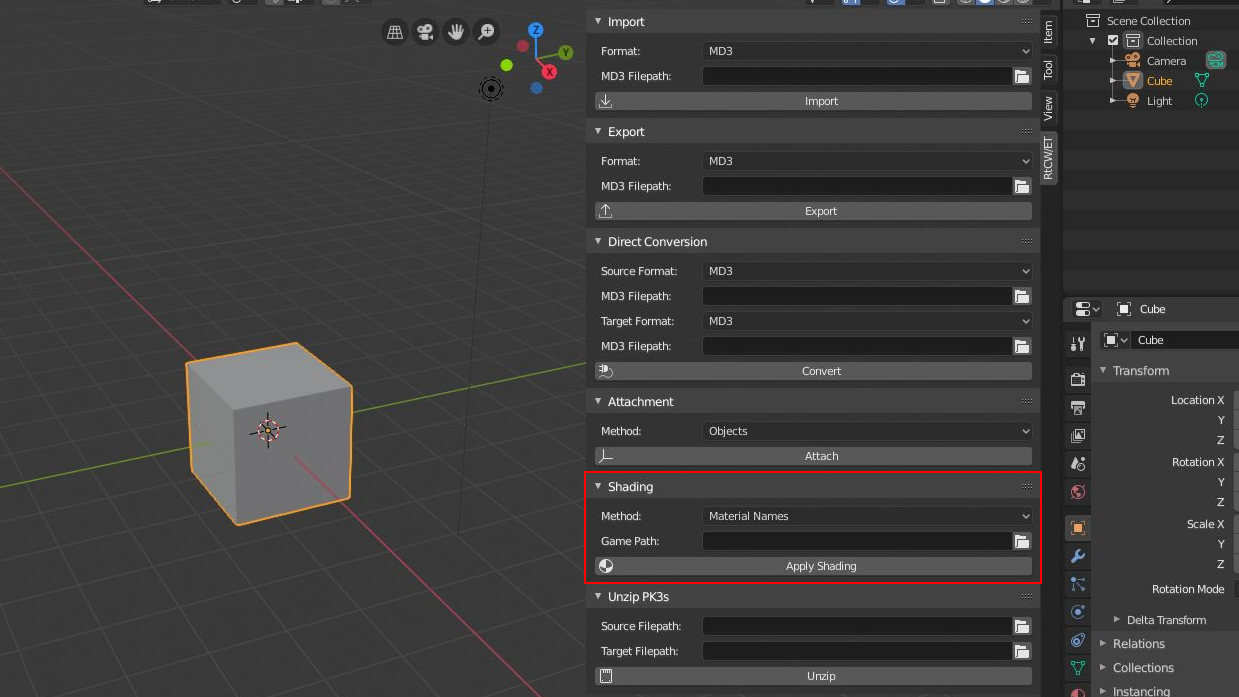
Shading
The shading panel allows to shade existing objects inside Blender.
The addon uses different methods for finding the textures:
- Material Names: allows to shade all objects inside a collection by using its material name as a reference to a shader name. First select the collection which should be shaded, then fill in the input field for the "Game Path", then click the "Shade" Button.
- Skin File: allows to shade all objects inside a collection by using information from a .skin file. First select the collection which should be shaded, then fill in the input field for the "Game Path" and "Skin Filepath", then click the "Shade" Button.
Input Fields
| Input Field | Type | Description |
|---|---|---|
| Method | Combobox | Sets the method for shading |
| Apply Shading | Button | Starts the shading operation |
| Game Path | string | Sets the path to the game data. Context-sensitive. The game data is a folder like etmain in W:ET. It should contain all PK3 files, but extracted, as the addon will not attempt to extract them during the operation. |
| Skinfile Path | string | Sets the path to .skin file data. Context-sensitive. A .skin file contains information for shading or attachment. It consists of a list of key-value pairs. For shading the key will describe a surface name. The value will describe the shader name. This is either a shader name from a script file (not supported) or a path to a .tga or .jpg texture. |
Results
By clicking the shading button the shading operation will start. If successful, the addon will find a texture and apply a basic set of nodes in the node editor. This data will not be considered during export.
Unzip PK3s
The Unzip Pk3 panel allows to unzip game data from PK3 files. Its main input fields are text fields to choose the source path of the game files and target path for the directory to copy the extracted data to.
Input Fields
| Input Field | Type | Description |
|---|---|---|
| Source Filepath | string | Sets the file path of the folder containing the game data. This is usually the etmain folder containing all compressed .pk3 files. |
| Target Filepath | string | Sets the file path of the folder which will contain the extracted .pk3 files after the operation. |
| Unzip | Button | Starts the unzip operation |
Results
By clicking the unzip button the unzip operation will start. The addon will find all pk3 files in the source directory and all its subdirectories, extract them, and copy them to the target directory. This operation is meant to prepare the game data path which may be required for other panels.